Showing posts with label bananas. Show all posts

Friday, September 21, 2012

Sweet Saturday #20: Raw Chocolate Banana Tart

For today's post, I'm sharing a really yummy recipe adapted from Good Girl Gone Green's blog. She always has such delicious recipes made with mostly (if not all) raw ingredients. You should definitely go check her out!

Anyway, when she linked this recipe up to Sweet Saturday last weekend, I just had to try it. I had most of the ingredients already, and what I didn't have, I improvised. I also had 2 ripe bananas needing to be used, so I tossed those in too. It came out phenomenal! The only thing I would do in the future is add some honey into the crust because I found it a little bland, but that's just me :) Other friends who tried it said they liked it just the way it was (yes, was, because this baby is gone!).


Raw Chocolate Banana Tart
(serves 8-12)

For crust:
1 cup nuts of your choice, such as almonds or pecans (I used a combination of almonds and cashews)
2 tbsp shelled hemp seeds
2 tbsp flax seed (I used some that were already ground)
1/2 cup coconut oil
1/3 cup shredded unsweetened coconut

For filling:
2 ripe bananas 
1/2 cup raw cacao or cocoa powder (I used cocoa)
1/4 cup honey, agave, or maple syrup 
1/4 cup coconut butter or oil (I used oil)

Note: If possible, soak nuts for up to 4 hours before using. I only soaked them for about half an hour, and everything turned out fine.  

Place nuts, coconut oil, and shredded coconut into food processor and blend until it is a fine crumble. Pour crumbs into a 8' or 10' pie pan and press into the bottom of the pan to form a layer, then place into freezer to set.


Looks like a beach...

Next, melt the coconut butter or oil if it is not melted already. You can keep things raw by melting it in a food dehydrator if you have one, or placing it in a small bowl in a larger bowl of warm water. Once melted, mix the ingredients for the filling together in the food processor, except for one of the bananas, until smooth.


Take the nutty crust out of the freezer, and spoon or pour chocolate banana mixture onto it, spreading it so that about an inch of the crust is still visible. Slice the reserved banana up and place slices on top of tart. Place in freezer until it sets, for about 1 hour (could very well take less, but an hour is for sure). Allow to defrost a bit before serving.


The one thing with placing the sliced banana on top is you have to keep the tart in the freezer once it's done, as to prevent them from getting all brown and gooey. If you'd rather keep it in the fridge so it doesn't take long to defrost (and easier to slice right away!), just don't put banana on top. It will still be beautiful and delicious!

Some other things you could use as toppings are:
  • sliced strawberries
  • blueberries
  • raspberries
  • sliced or crumbled nuts
  • shredded coconut
Just to name a few!

Eating raw helps to contain all natural enzymes present in food, which would be decreased or destroyed from cooking. These enzymes help our bodies to absorb the nutrients found in foods. Cooking food can also cause harmful compounds to form- especially if you burn or overcook something -that can be cancerous.  

In this day and age, it's difficult to go completely raw, but it's good to eat as much raw foods as possible, especially fruits, vegetables, and legumes. This tart will enable you to eat healthy and raw without having to lose the enjoyment of eating! Good Girl Gone Green has TONS of fantastic raw food recipes on her blog, as well as information about choosing a healthier raw lifestyle, so do take a look if you are curious about eating raw! 


OK- now it's time for the hop! Our guest-hostess today is April from April's Country Life Blog. She has the most adorable tea party treat recipes and other fun country-style tidbits. Please follow her and show her some love! 

I especially liked this fabulous cake she made for her daughter's birthday !

Just follow these simple rules:

1. Link up something sweet to really WOW us all- your blog, Etsy store, Pinterest, Facebook, whatever you want! 
2. Link-up as much as you want and please follow April's Country Life Blog and me if you are not already. Leave me a comment if you are a new follower so I can follow you back!
3. Hop around and say hi. 
4. Share my button to get more people to join us (not required, but it would be nice!)

 
Photobucket
<a href="http://jessica-healthymommyhealthybaby.blogspot.com/" target="_blank"><img src="<


Photobucket" target="_blank">Photobucket

Friday, September 14, 2012

Sweet Saturday #20: Quinoa Smoothie

I got this idea for a protein-packed, super thick smoothie from the aptly-named, Green Thickies blog. I had heard about it being possible to make a smoothie using cooked quinoa, but after Katherine Natalia linked up her version onto Meatless Monday earlier this week, I decided it was high time I tried it!

I happened to have some recently purchased quinoa in my cupboard, along with other things that could easily be used to make a good-tasting and super healthy smoothie. No green stuff left (I had just made a big batch of kale pesto!), so this was all fruit, protein and omegas! The quinoa gave it a slightly nutty taste, but other than that, it tasted just fine!


Banana-Mango Quinoa Smoothie

1 cup cooked quinoa
1 banana
1 mango
1 cup coconut-almond milk, or milk or your choice
1 tbsp honey
1 tbsp shelled hemp seeds
Ice cubes (optional)

Cook the quinoa ahead of time according to package instructions; it is just like cooking rice. Toss all ingredients into blender and hit "Blend" or "Puree", depending on how smooth you want it. Pureeing will make it less "chunky", as the quinoa will create some minor lumps in the smoothie. I kind of liked that! Serve with ice is desired.


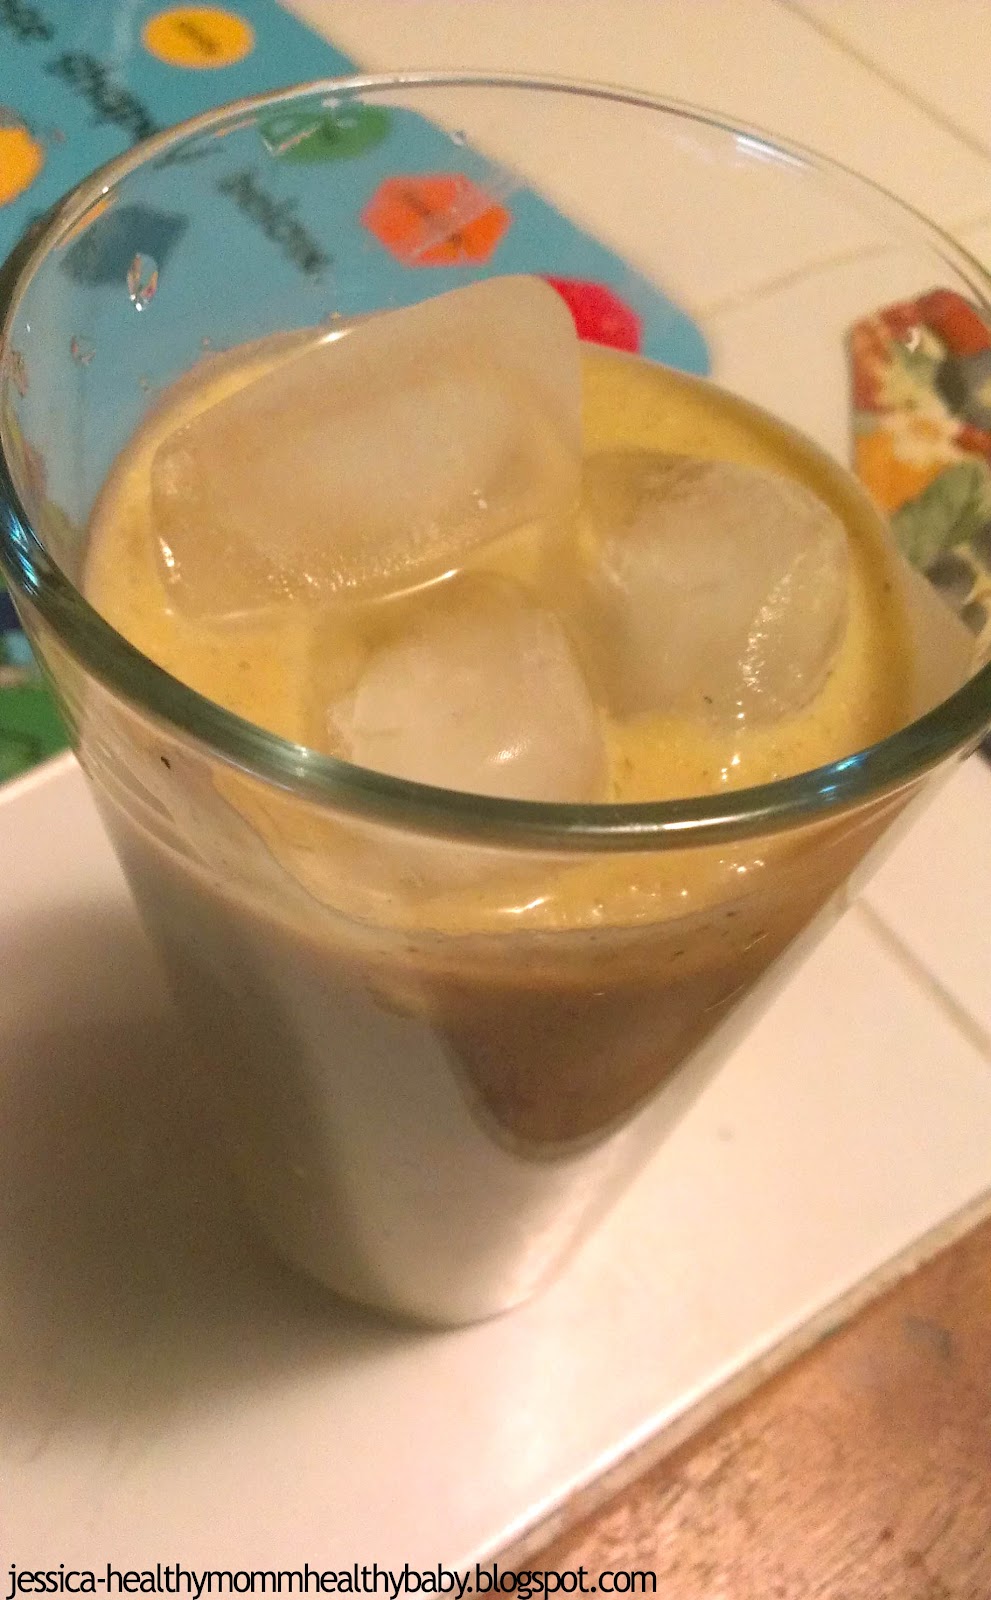
The smoothie came out so thick that the ice cubes rested right on top of it! I thought this helped to make it easier to drink, but if you like it extra thick, then this is the recipe for you! You can even blend the ice cubes right into it.

Other ingredients you can add:
  • vanilla extract
  • ground flax seed (this will give it an extra nutty taste)
  • soaked raw almonds and/or cashews
  • peanut butter (or other nut butter)
  • pineapple
  • peach
  • melon
  • spinach
  • just about anything that goes well in a smoothie!

Quinoa is considered a super food, and contains such a high amount of protein, it is called a "complete protein" since it contains all the amino acids needed to meet our nutritional needs. It is also high in other important nutrients, such as iron, calcium, copper, and manganese, to name a few. It is gluten-free and incredibly versatile to cook with, making it a great addition to soups, salads, breads, and even cookies!

This is a great smoothie for the whole family, perfect for enjoying with breakfast. It can easily replace your coffee with the amount of healthy carbs it contains to jump-start your day. Simply add whatever fruit you and your family enjoy most to make it work for you.

OK- now it's time for the hop! No guest-hostess today- sorry! I just didn't have time to organize that aspect this week. Just follow these simple rules:

1. Link up something sweet to really WOW us all- your blog, Etsy store, Pinterest, Facebook, whatever you want! 
2. Link-up as much as you want and please follow me if you are not already. Leave me a comment if you are a new follower so I can follow you back!
3. Hop around and say hi. 
4. Share my button to get more people to join us (not required, but it would be nice!)

Healthy Mommy, Healthy Baby

Thanks so much for linking up, I really do love Fridays even more because of this :)

Monday, July 30, 2012

Meatless Monday: Frozen Tahini-Banana Bites

Every so often I stumble across a recipe that gets me really excited. The requirements for such excitement usually are:
  • unusual prepartation or ingredients
  • uses ingredients in a way I never thought of
  • is not only delicious, but also healthy!  

And I get especially excited when it's an easy-to-make dessert that is sugar-free and I just so happen to have all the ingredients readily available! 

I came across the recipe for Frozen Yogurt Tahini Banana Cups (what a mouthful!) via Simple Living with Diane Balch (currently my favorite food blog, I might add!) when Fox in the Kitchen linked it up onto the Foodie Friday blog hop. Fox in the Kitchen has a wealth of awesome recipes on her blog, so do check her out, and she based the recipe off of the vegan version from The Veggie Nook (lots of good stuff there, too!). And she got the recipe from Sketch-Free Eating, a blog that has many amazing raw-based recipes, and they got it from...somewhere. I couldn't find the original recipe on their blog, they have way too much amazingness on there that easily distracts me...

SO, with all that being said, you know this recipe has to be awesome if so many people felt the need to keep passing it on! I made a batch for a Sunday afternoon gathering, and I'm sorry to say they did not go over as well as I'd hoped, although I found them to be so yummy and delicious that I ate half the batch myself. They are lightly sweetened and just melt in your mouth! Not everyone is as enthusiatic about healthy-eating as I am. That's why I am so grateful for my blogging community that can appreciate recipes like these, at least I hope so...

I had the cute Disney cupcake liners left over from Lily's 2nd birthday party :)

Frozen Tahini-Banana Bites
(this is the exact recipe from Fox in the Kitchen, but I just think that title is less of a mouthful!)

Ingredients:

1/2 cup of cold-pressed coconut oil
1/2 cup tahini
1-2 ripe banana
1/2 cup plain regular or Greek yogurt 
4 tbsp honey or agave (you can use less, but I thought this was the perfect amount)
1 tbsp raw sesame seeds
Pinch of sea salt
24 blueberries+ for topping (optional)
24 cupcake liners 

Note: the recipe from Fox in the Kitchen says this makes 2 dozen, but I was only able to make half of that with this amount. Perhaps I used too much batter per cupcake cup, or perhaps I just used larger-sized cupcake cups than she did, but if you want to make the full 24, I suggest not to be too generous with filling each cup with the mix.

What I used

Combine the coconut oil, salt, honey or agave, and tahini in a small bowl; it will work better if the tahini and coconut oil are softened or melted. Next, add the yogurt until well-combined. Slice the banana(s) into 24 slices. Spoon some of the mixture into each cupcake liner, then place a piece of sliced banana on top, sprinkled with some of the sesame seeds. Place cupcake cups on tray in freezer and freeze until batter is set, for about 5 or so minutes.

The batter
After first freezing phase

Take the tray out of the freezer then spoon the rest of the batter on top. Sprinkle with sesame seeds and then place tray back into freezer. Allow treats to freeze for at least one hour before serving.

Now, to "add a little something", I placed a single, fat blueberry on top of each treat to make it look a little more appealing. I think they came out cuter-looking that way, and you can of course get even more creative with whatever you choose.  


Another thing I did to make things more fun was to put blueberries in the middle of one of the treats for one of the kids to find. Whoever got the treat with the blueberries in the middle won a prize! (In this case, my friend's daughter found them and she won a word card game. She was very pleased with this:). 

After taking my first bite, I thought of so many other creative ways you can mix this recipe up. Here are some suggestions:
  • use peanut or almond butter in place of tahini
  • add raw carob or chocolate shavings as topping
  • add extra fruit to the middle or top
  • mix chocolate, vanilla, almond, etc. flavoring into batter
  • put jelly in the middle

I am going to try and make them with peanut butter and chocolate next time! They may go over better with the pickier eaters in my life that way. Plus, how can such a flavor combination go wrong?

The general consensus of this recipe among my family and guests was:

Friend 1: "Good, but weird."
Friend 2: "Tastes like halvah; could use more banana."
Daughter of friend 1: "No thanks." (she's vegan)
Daughter of friend 2: "Yum." (she found the blueberries)
Lily: peeled off the banana and left the rest
Paul: "Yuck!"
Me: "Yum, yum, yum, I'll eat the rest!"

I hope the mixed response does not deter you from trying this if you're curious and especially if you're passionate about raw food and healthy eating. This is super-easy and cheap to make and definitely a much better alternative to store-brought popsicles and ice cream. 

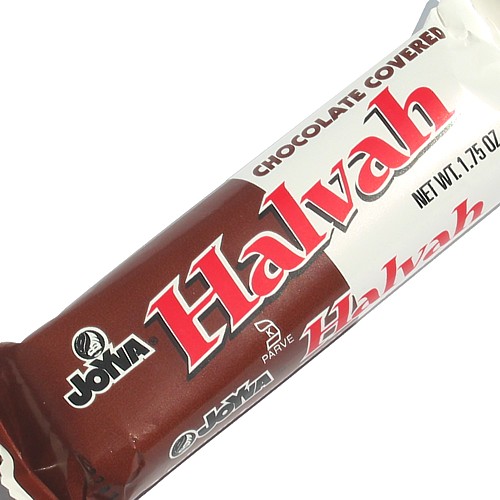
Tahini is an incredibly tasty and versatile ingredient that I don't think is used much at all in the western world. It is a very popular condiment and ingredient in parts of Africa and the Middle East, used as a sauce in many yummy dishes. Tahini is essentially sesame paste; when mixed with water and a little salt, if makes a salty, nutty sauce that can be used as a topping on things like tofu, chicken and vegetables, or as a great salad dressing. This is the first time I've seen it used in a dessert other than Halvah. If you don't know what Halvah is, it is like a Turkish candy bar (pictured below). 

Halvah can also refer to any sweet, dense sesame seed treat, but this is the most recognized and commercial version in the West

Sesame seeds contain an abundance of vitamins and minerals such as copper, manganese, calcium, iron and vitamin B1, plus much more! That's a lot for such a small seed. These nutrients can help heal and prevent ailments such as arthritis, colon cancer, and osteoperosis. They also help to lower cholesterol and support bone health.

Have a happy Meatless Monday and do let me know if you try this unique recipe, and also if you decide to pass it on as well :)


Friday, June 1, 2012

Sweet Saturday #7: Sweet Product Review!

It’s been a busy week, and it looks like things will just be getting busier and busier for me. My new job is starting to really pick up, and by mid summer I expect us to be in full swing! I will keep you posted on this exciting new venture of mine as details develop. For now, we are in such “baby steps” mode that I feel I should keep mum on the word.

SO, finding time for trying fun new recipes has been hard. But, finding time to try fun new things hasn’t!

The Ben & Jerry’s Ice Cream is on sale at Shop Rite by us this week, so I picked up a couple of flavors since our ice cream maker broke (that was the main way we’d been enjoying ice cream for the past 2 years). I got Irish Mudslide which was good, but I also got a flavor of their new Greek Frozen Yogurt line- Banana Peanut Butter. And that was really good!  I didn’t really know what to expect, but you know Ben & Jerry’s rarely disappoints. It’s banana flavored Greek style frozen yogurt with swirls of rich peanut butter. Yummmmmyyyy. Add some hot fudge and fresh strawberries and you might think you’re eating a banana split!


It also has less fat than most B&J’s flavors (8 g per ¼ cup serving), but still has a lot of sugar per serving, at 26 g. One of the things I like most about B&J’s ice cream is that they have a dedicated pledge to not use milk from cows treated with rBGH. That makes me happy. It would make me even happier if thy also pledged to use organic and no corn syrup, but it’s still a step in the right direction. They are also very socially active regarding the green movement, Fair Trade, and even Occupy Wall Street.

You may not know this, but Greek style yogurt is considered to be even better for you than regular yogurt. It contains twice as much protein, has less sodium, is lower in carbs, and easier on the stomach digestion-wise. Greek yogurt is thicker and creamier than regular yogurt because the extra whey and water is removed, thus also making you feel fuller after eating it. Read more about the amazing benefits of Greek yogurt here at Livestrong.com.

Next time you see Ben & Jerry’s Greek Frozen Yogurt at the supermarket, don’t be afraid to give it a try! There are a lot of good flavors out!

Note: I was not paid or asked to write this review, I did it by my own accord. Do you know a great product I should review, or a product you’re curious about but afraid to try? Let me know in the comments! Just please suggest a natural, organic, eco-friendly, or health or food-related product so it will at least coincide with my blog’s theme, thanks! OR you can send me a product you'd like me to review for you, contact me at healthymommyhealthybaby@gmail.com for more details regarding that.

Now it’s your turn to share! This week’s guest hostess is Julie from Naptime Review. Please follow me if you have not done so already, and Naptime Review. Then link-up something sweet to share- a blog, an Etsy store, an FB page, Twitter page, Pinterest, whatever! Hop around and say hi. Grab a button to spread the word! Have a great weekend!


Photobucket
<a href="http://jessica-healthymommyhealthybaby.blogspot.com/" target="_blank"><img src="<Photobucket" target="_blank">PhotobucketPhotobucket />" alt="Healthy Mommy Healthy Baby" width="125" height="125" /></a>

We hope to go the beach this weekend, what are your plans?

At the Jersey Shore last summer. Waters aren't so blue there...

Thanks for stopping by! Have a great weekend!

Friday, May 18, 2012

Sweet Saturday #5: Puckered Papaya Smoothie


First of all, I just wanted to share this picture of my perfect breakfast that I took this morning:


I thought it just looked too pretty not to share :) 

Now, enjoy this:

 
Puckered Papaya Smoothie
serves 2-4

1 cup chopped papaya
1 ripe banana
1/2 cup orange-pineapple juice
1/2 cup almond coconut milk
1 tsp honey
Juice of half a lime
Lime wedges for garnish

Put all ingredients except for the lime wedges into blender. Blend or puree until smooth. Serve in glasses with lime wedges. Tip: rub the lime wedge along the rim of the glass to get that puckered lime taste each sip!


Boosts you can add:
  • aloe vera juice
  • hemp seed powder
  • coconut oil
  • protein powder
  • super greens powder
  • ginger

Add about 1 tsp each per serving for maximum benefit!

The whole fam will love it! Make a big batch and share it at a party or gathering. This would be a hit at your Memorial Day weekend BBQ!  


I just love papaya, and I certainly don't eat it enough. They are technically in season June-September, but Paul came across this yummy smoothie recipe and I just couldn't wait! Besides being positively delicious, papayas are full of so much healthy goodness. They have high amounts of vitamin c, vitamin a, folate and potassium. They protect against heart disease and aid in immune support and digestion. 
They have also been found to prevent macular degeneration (primary cause of vision loss in older adults) and when combined with green tea, papaya can protect against prostate cancer! Papaya is considered by many to be a super food.

Now it's your turn to share something sweet with the return of Sweet Saturday Link Party! Link up a sweet treat, a sweet post, a sweet photo, a sweet Etsy shop or Facebook page- whatever you want! Just remember to follow your hostess and, if you'd like to, share the link on your page or blog with the button below. Whoever's link gets the most visits will be offered to co-host next week!


Photobucket
<a href="http://jessica-healthymommyhealthybaby.blogspot.com/" target="_blank"><img src="<Photobucket" target="_blank">Photobucket />" alt="Healthy Mommy Healthy Baby" width="125" height="125" /></a>
 
Have fun and share as much as you'd like! Have a great weekend!


Oooohhh, I almost forgot- I FINALLY joined Pinterest, so be sure to follow me and/or pin this sweet little recipe. I'm new to it, so feel free to "show me the ropes" ;)


Friday, February 17, 2012

Sweet Saturday Blog Hop #3 THIS CHICK IS BANANAS!

Today I'll keep this short and sweet (see what I did there??). Right now I'm watching Lily build with her foamy blocks in a tub full of bubbles, and once she's done and dressed for bed, I'll be getting ready for GIRLS NIGHT OUT! Whoo-hoo! So, I figured I'd better post this early since I made need time to re-cooperate tomorrow and not worry about blogging. Let's consider this hop "Sweet Weekend Blog Hop" :)


Today I'm sharing some cute pics of Lily eating a banana, and our favorite smoothie recipe :D


It was her first time eating a banana with the rind on it


Strawberry-Banana-Peanut Butter Smoothie

Ingredients:

1 banana
1/2 cup strawberries
1/2 cup plain yogurt
1/2 cup milk, almond milk, soy milk, or coconut milk
1 big spoonful of peanut butter

Throw it all in your blender and blend away! This makes 2 large servings or 4 small servings, so add ingredients accordingly. Enjoy!

Now it's your turn to share! Link whatever you like as long as it's something sweet. It can be a blog post, an Etsy shop, your lovely website, your FB page, whatever! Link as many as you like, just don't link the same thing more than once, thanks! And please just follow me, your hostess, preferably by Linky Followers since GFC is ending very soon. Or better yet, subscribe! Have a great weekend!


Photobucket
<a href="http://jessica-healthymommyhealthybaby.blogspot.com/" target="_blank"><img src="Photobucket" alt="Healthy Mommy Healthy Baby" width="125" height="125" /></a>

Friday, January 13, 2012

Banana Flax 'n Walnut Bread Machine Recipe

I love my bread machine! If you read my last post featuring a bread machine recipe, you already know why. They make things so convenient, and with one, anyone can be a baker! Here's a great new recipe for banana bread, yum! It can be made dairy-free as well, so it's perfect for those with allergies who enjoy fresh-baked bread.

Banana Flax 'n Walnut Bread 

Ingredients

1/2 cup warm water
1 tbsp butter or canola or coconut oil
3 tbsp honey
1 egg
1/2 tsp vanilla extract
1 cup whole wheat flour
1 cup unbleached flour
1/4 cup ground flax flour
1 very ripe banana, mashed or sliced
1/2 tsp cinnamon
1/2 tsp salt
1 1/2 tsp dry yeast
1/2 cup crushed walnuts
1/4 cup flax seeds

Bring all ingredients to room temperature, then place all except the walnuts and flax seeds in bread machine according to instructions (mine has me place the wet ingredients in first, with the yeast on the top). Set the loaf size to 1.5 lbs on the "Basic Bread" setting, with crust setting however you want it (I normally use "Medium"). Turn it on, then add in the walnuts and flax seeds at the appropriate time if your machine has you add them in later in the cycle, and remember to remove the kneading blade before it starts to bake so you don't get a broken loaf. If you prefer, take the dough out after the kneading cycle has finished and mold it into a desired shape, then stick it in the oven for about 30 minutes at 400 degrees. After about 4 1/2 hours using the bread machine, you'll have fresh baked bread! 

Be sure to use a ripe banana!

Banana bread has always been a favorite of mine. My mom makes it from scratch by hand, and I have many fond memories enjoying it with some butter or peanut butter spread on top. Few things in life are better than warm banana bread.

I can't think of any kid who doesn't like banana bread either- it's sweet and healthy with the honey and whole wheat flour, too! And you know how much I love flax! Making bread with a bread machine is a perfect way to get your kids to help out without making much of a mess. It's simple to just measure the ingredients together then one-by-one place them in the machine together. Plus, what kid doesn't like pressing buttons? Lily loves fresh baked bread :)

Helping me scrape the sides of the bread pan, taken last summer


Tuesday, August 30, 2011

Guaranteed Life-Saving Breakfast


This morning I was rudely awakened by a screaming toddler and Paul lying said screaming toddler onto the bed next to me, while stating, “I can’t deal with her right now, I have to get ready for work.” To which I may or may not have replied with a squinty-eyed look of confusion with a dash of anger at having been awoken this way; I went to get a bottle and then I changed her diaper and tried to get her back to sleep, seeing as how it was 6:30 in the morning and I usually sleep until at least 8. The bottle soothed her, but did not put her back to sleep, and alas, I was forced to get up, cussing under my breath (or not so much under my breath) all the way to the bathroom then kitchen.

You’d think I was used to being woken by a screaming baby by now, but I was just particularly tired this morning since I’d been dealing with Lily being sick the last three days, plus all the excitement of Hurricane Irene. Luckily we were barely affected by the stormy weekend weather, but Hurricane Lily had made her mark for sure. Anyway, I’d been hoping to get a little more sleep than I had been, but I quickly got over all my feelings of bitterness and exhaustion after I had this tasty energy-packed, life-saving (and husband-saving) breakfast!

Yogurt and granola with raspberries, banana and blueberries topped with flax seed, coconut and honey, plus a few Berry Blossoms courtesy of Lily :)


Fully Loaded Yogurt Bowl

½ cup plain organic yogurt
½ cup granola
½ or 1 banana, sliced
¼ cup raisins
Handful of blueberries and raspberries
1 tbsp flax seed
1 tsp honey
1 tsp shredded coconut

Scoop yogurt into bowl then top with granola, followed by fruit, honey, flax seeds, and coconut. Mix well if desired or go ahead and eat as is! You can use any combination of fruit that you like and other add-ins like nuts. I typically just use whatever fruit I have available; banana with mixed berries is always good, but peaches and apples are great too. The base of any good yogurt bowl is the yogurt (duh), granola, and fruit; after that, you can just toss in whatever you desire.

The breakfast Lily and I enjoyed the other day. I add coconut milk to my coffee instead of cream for it's natural sweetness and extra calcium. Try it next time and you'll see a pleasant difference!


It’s as simple as that! Add a green smoothie or cup of coffee to the mix and you’re good to go! All clouds of sleepiness will be lifted and you’ll be ready to start you’re day. And it only takes about 3 minutes to make!

I’d like to say many people eat this kind of breakfast in the morning, but it’s more likely that pastries and cold cereal are devoured along with sugared coffee, if anything is devoured at all since statistics say that many Americans skip breakfast. I know my husband often does, as much as I’ve begged him to eat something before heading to work in the past (I have since given up), although from what he’s told me sometimes he does get an egg sandwich from the deli or a donut from the office (hence my prior complaint). He is not alone in this world of 9-5ers who barely have time for a cup of Joe, let alone a bowl of granola and fruit.

I’ve always made it a priority to eat in the morning, even if it does have to be cold cereal (there isn’t anything wrong with that, but it won’t get you through the morning like a fuller meal will). The fact of the matter is I will be very cranky if I don’t eat since I get that way when my blood sugar is low. But, if you are someone who normally doesn’t eat in the morning and doesn't even have 3 minutes to spare on putting something like this together, you can make this yogurt bowl to-go the night before by placing it in a travel-ready container. I wouldn’t recommend eating and driving, but while waiting for the train during your commute, you could probably eat most of it then finish the rest at your desk!

Lily is big on this type of meal too, although this morning she was a little picky, I guess due to still feeling a little under-the-weather, but I did get her to eat some blueberries and cereal even though she passed up the yogurt and banana. Your little one will definitely enjoy this breakfast in any combination and at any age, and can be blended for babies ready for solids. Please note that babies younger than 9 months shouldn’t eat berries due to possible allergic reactions, and yogurt should wait until they’re at least 6 months unless otherwise stated by your child's doctor.

Adding the flax to your yogurt bowl- or just about anything you eat for that matter –is a sure way to get a boost of omega-3s and fiber, and they're particularly great for bone and heart health (and brain, of course, with the omegas). Studies havealso shown flax to help in preventing cancer, diabetes and inflammation, and also in lowering blood pressure. Flax seeds are wonderful and a little bit goes a long way. They can be added to just about any baked good or cereal, topped on veggies, ground for breading on meats and tofu, topped on salads…the possibilities are endless!

I use flax quite often, although I don’t think I’ve mentioned that here before. When Lily started eating solids, it was recommended by my mother-in-law and sister-in-law that I add ground flax meal to her cereal and breast milk, and I’m glad I heeded their advice. Omegas are especially vital to helping a baby’s brain development as you have probably read or been told by your child's pediatrician if you have a good one, so go ahead and pick up a bag and just sprinkle it right on your baby’s or child’s cereal- they probably won’t even notice a difference in taste or texture, but if they do, they will get over it eventually. 

Save this recipe for your own "too early" mornings, and hopefully it will rescue your husband or screaming child from getting his/her head chopped off ;)


Thursday, August 18, 2011

Frozen Summer Treat!


I’ve been wanting to post a tried and tested summer treat recipe, but hadn’t really hit any goals that I thought were worth sharing. I made a few different flavors of popsicles, but none were exciting or even tasty enough to gab about, and the ones that did taste good weren’t exactly healthy. I got an ice cream maker last spring and did some experimenting with that, but really the best flavors were the classics- vanilla and chocolate –and whenever I did come up with a flavor that was anything other than those, it was only because I used a flavor extract like mint or orange. In other words, it would be lazy of me to post a recipe for such things.

But, then, I remembered an old frozen treat from my childhood that I didn’t only enjoy eating, but also enjoyed making myself. It could be messy, but fun, and my mom was usually more than pleased to make these with me, because besides being delicious, there were actually nutritious qualities to it too. Many of you will probably know this one, but I wonder how many have actually ever made…

Chocolate-covered Frozen Bananas

2 bananas, cut in half
¾ cup chocolate chips
2 tbsp coconut oil
Extra toppings choices: shredded coconut, chopped nuts, granola, chopped dried cranberries or cherries, sprinkles, chopped espresso beans, etc.


Stick a popsicle stick or chopstick or whatever you have available to use for a handle into the bottom of each banana half, length-wise. Place the halved bananas on a tray or plate in freezer and freeze for at least 30 minutes. When the bananas are close to ready, melt the chocolate chips and coconut oil in a small saucepan or in a Pyrex glass in the microwave on high for 30 seconds. Mix until smooth. Remove from heat, then get the bananas out and carefully dip them into the chocolate, covering them, then lay on a piece of parchment paper on a tray or plate to put back into the freezer. Sprinkle with toppings of your choice. Put them back into the freezer for another 30 minutes or until set (may not take very long depending on how cold your freezer is). Best to enjoy these bananas outside under the sun!

And there you have it- a sweet, yet healthier option to store-bought popsicles and they don’t take very long to make, with little effort to boot. If you have kids that are of an age where they can handle dipping bananas into chocolate without dumping it all over themselves, they will enjoy helping you with this, and also getting to apply their very own toppings. Baby can obviously enjoy some mashed up bananas, but for an extra treat, add some shredded coconut topping. Toddlers can enjoy this at your discretion, as you may not want to give them chocolate yet or their teeth may be sensitive to the cold.


As everyone knows, bananas are super-healthy and incredibly versatile in many recipes. They are loaded with potassium, protein, vitamin B6 and vitamin C. Bananas help to improve cardiovascular and kidney health, and even contain a lesser-known prebiotic compound called fructooligosaccharide, which helps the body absorb nutrients such as calcium more efficiently, thus promoting denser bones.

One thing I’ve always noticed bananas are good for is as the perfect on-the-go snack for a burst of energy. I eat them just about every day either right out of the rind, sliced up on whole wheat toast with peanut butter and honey, in freshly-made smoothies, or in desserts such as the frozen bananas and caramelized with frozen yogurt (or vanilla ice cream!).

Since I’m also talking about chocolate here, I want to bring up a lesser-known plight that is taking place mainly in Africa that involves the way cocoa beans are harvested. Many children are forced into cocoa bean harvesting- which is very hard labor –either because it is the only way they can make money for their families, or far worse, they are often kidnapped and forced to work as slaves. They work for hours on end in the blistering sun, usually without breaks and without eating or drinking anything. Children reportedly as young as 8 years old are doing this work. And, even though many of the major chocolate companies like Nestle and Cadbury say they are doing their part to only use Fair Trade cocoa beans, it is incredibly difficult to track just where these beans are actually coming from (like a “blood diamond”).  Furthermore, many farmers in these impoverished countries are being taken advantage of and not receiving fair wages from the yields they provide.

There are a few brands that are taking greater strides to ensure they know where their cocoa beans are coming from, brands like Dagoba, Newman’s Own Organic, and Endangered Species all use organically grown beans which are also Fair Trade. Click this link to learn more about how they are certified and to see other brands that use organic and Fair Trade cocoa beans.

I don’t want to plant a guilt trip on anybody- I mean, how awful is it to have to worry if kids were breaking their backs over the cocoa used to make the delicious Godiva truffle you’re about to enjoy (sadly, they most likely were!). This issue only very recently came to my attention as it has received very little coverage in the news, like most child labor issues do, and I’m sad to say coffee beans are effected similarly. So, even though Fair Trade and organic brands do tend to cost a bit more than Hershey’s and Folgers, if you can afford it and want to make a difference, indulge your sweet tooth with a bar labeled Fair Trade Certified and/or Slave-Free to ensure you are not giving money to the types of people who would put children’s well-being at risk just to make some money.

Thursday, August 11, 2011

A Green Smoothy for Picky Eaters of Any Age


One morning I looked in my kitchen and was pleased to see my husband had done a good job grocery shopping job the night before. I’d gone to bed early due to…just being tired!...and missed him when he got home. I gave him a call to let him know I appreciated it, and then he mentioned the organic spinach he’d gotten and suggested I make green smoothies for Lily and myself. And I figured, why not? I had almond milk, bananas, peaches and honey, and really, that plus the spinach is all you need to make a green smoothy that doesn’t taste like grass!


Delicious Green Smoothie

1 cup almond milk
1 cup spinach (or other green such as kale)
1 banana, broken into chunks
1 peach, chopped (or other sweet fruit, such as an apple or ½ a cantaloupe)
1 tbsp honey (stevia can also be used)

Put all ingredients into blender; a good technique is the layering technique, which would go: banana, spinach, peach, honey, almond milk. Blend until smooth. Pour into glasses (or sippy cups). Enjoy. It’s that easy!

How good does that look?

I was even surprised at how great this tasted, and we’ve been drinking them ever since. Tastes much better than those powdered shake mixes, that’s for sure. You can use just about any greens and sweet fruit, but always keep the banana to give it that thickened quality. If you want it even thicker, add a few spoonfuls of yogurt. If you use sweetened almond milk, then you can leave out the extra sweetener if you want (depends on how sweet you and your child like it!).I like also like to keep it vegan so it's healthier, but you can definitely use cow's milk or soy milk instead of almond, but if you haven't tried almond milk, you may want to- it's a really good alternative to conventional milk.

It’s really that simple. And most kids like green things that look weird thanks to Nickelodeon, and are unlikely to be turned off by the color. So, don’t let on if you think it’s weird then they might follow suit and not taste it. There was definitely a time I couldn't imagine drinking any "green" drinks, even the thought of wheatgrass turned me off. But, one day I gave one a try (I think it was by Naked) and liked it, then gave wheatgrass a go and that wasn't so bad either, and now I don't have any issues going green with my beverages!

Health food stores and gyms offer energizing smoothies as an alternative to coffee and sugary carbonated drinks, but they are very simple to make at home, and less likely to hurt your budget! Don’t be fooled by places like Jamba Juice though- their drinks are full of hidden sugars and fillers- mainly in the free “Boosts”. Just have a look at their menu. On this menu, sugars are not listed in the Boost ingredients, but if you see the menus they have available at the registers, you will be shocked at how much sugar goes into them (at least they were listed when I used to buy Jamba on the regular years ago, so things may have changed). They have also been criticized for using artificial flavors, although I could not locate any reliable source for this on the internet, but I wouldn’t be surprised since the colors are so bright.

But, anyway, enough with dissing Jamba Juice. Truth is, the drinks are delicious and still better for you than soda, but quite pricey too! So, if you have a few minutes, make your own fruity energy drink at home. They are chock full of vitamins and minerals without having to add anything synthetic; you don’t even need to add any vitamin powder unless you want to take your vitamins that way, but in my experience, those types of drinks always just end up tasting gritty because the powder never dissolves properly (and I’ve tried quite a few of those types of powder supplements).

Greens are super good for you and mixing them with fruit isn’t as icky as it sounds. In fact, have you ever had a strawberry and spinach salad? You’d be amazed how great that combo is! Here’s a little bonus recipe from one of my favorite magazines.

When experimenting with smoothie recipes, if you find a combo you really love, please share in the comments! Thanks for reading!
Related Posts Plugin for WordPress, Blogger...