Showing posts with label healthy. Show all posts

Thursday, October 25, 2012

Product Review: EnviroKidz Organic Leapin' Lemurs Cereal

It's been a while since I've done a product review. I don't write them often; a product really has to impress me to get me to blog about it. 

Like most kids, Lily loves her cereal. At least once a day, whether it's breakfast time or not, she's looks at me and says, "Cereal, Mommy". She gets it from her daddy, I think- Paul likes to have it for a snack, too.

It's hard to find a good cereal that is healthy and fun that's not covered in sugar. Not that Lily needs to eat a sweet cereal; in fact, she is happy with shredded wheat and bran flakes. Yet, when I saw this adorable cereal box in the "Natural Foods" aisle at Stop & Shop, we just had to give it a try.


How cute are those lemurs? The cereal is peanut butter & chocolate flavored, and made from organic ingredients such as corn meal, molasses, soy oil, and of course peanut butter and cocoa. It's gluten-free and low in sodium, and also boasts packaging made from 100% recycled paperboard. On one of the side panels, it gives examples of why it's good to eat eat organic, which can be helpful for older kids who are already reading when they're sitting at the table like this:


The box also has information about lemurs on the back. Kids can learn about where lemurs live, how they are becoming endangered, and a non-profit group that helps to protect them. This is definitely better reading than the hyped-up cartoons and games they put on most kids' cereal boxes. 


Now, I'm sure you've heard enough about the packaging- how's the cereal??? Well, Lily always asks for seconds, and then even thirds! It does taste pretty good, sort of like a Reese's Cup without being too sweet. A very nice balance with the almond milk. The cereal is little balls with a nice crispy, crunch texture. I say it's a hit!


EnviroKidz® also makes these other flavors:
  • Gorilla Munch
  • Koala Crisp
  • Peanut Butter Panda Puffs
  • Amazon Frosted Flakes

Look for them at your local supermarket if you want to try a fun kid's cereal that's organic and good for the environment and its inhabitants.


Note: I was not paid or asked to write this review, I did it by my own accord. Do you know a great product I should review, or a product you’re curious about but afraid to try? Let me know in the comments! Just please suggest a natural, organic, eco-friendly, or health or food-related product so it will at least coincide with my blog’s theme, thanks! OR you can send me a product you'd like me to review for you, by contacting me at healthymommyhealthybaby@gmail.com for more details.

Friday, October 19, 2012

Sweet Saturday #25: Nutty Peanut Butter-Banana Cookies

It's officially baking season in my house now! Our oven hadn't been working since we moved in to the new house, and Paul finally got around to tinkering with it, and somehow got it to work. Hooray! So, I got started on making some cookies, and here's a new one I came up with. It's so tasty, moist, and healthy you could even have them for breakfast!


Nutty Peanut Butter-Banana Cookies
(makes about 30 cookies)

Ingredients:

1 1/2 cups whole wheat flour
1 tsp salt
1 tsp baking soda
1 cup honey + a little extra for topping
3/4 cup coconut oil, softened (you can also use shortening or butter)
1 egg
1 ripe banana, mashed
1/2 cup peanut butter
3/4 cup cut oats
1/4 cup hemp seed
1/4 cup flax seed
1 cup walnut pieces
1/4 cup brown sugar or honey

Preheat oven to 375. Mix the flour, salt, and baking soda together in a bowl until combined. In a separate bowl combine the honey, coconut oil, and egg together; then mix in the banana and peanut butter. Slowly incorporate the flour mixture into the wet ingredients with an electric beater until well-mixed. Last, add the oats, hemp seeds, and flax seeds. 


On ungreased baking sheets, place small spoonfulls of the batter onto the sheet, at about an inch apart. Place into center rack in oven. While they're baking, heat the walnuts and brown sugar in a small pot over medium heat. When the brown sugar starts to melt, start mixing together with the walnuts, being careful not to burn. Continue until sugar is all melted and coating the walnuts, should take about 5 minutes. 


Spread candied walnuts over a sheet of parchment paper and allow to cool for a moment. At the 10 minute mark on baking the cookies, remove them from oven without turning off the heat, and carefully press the tops with the back of a spoon in order to make a shallow indent. Dab a little extra honey onto each indent, the place a few of the candied walnuts on top of each cookie. Bake for another 5 minutes, or until cookies are lightly browned. Allow to cool before serving.


This is a recipe I came up with on my own. I had an overly ripe banana I needed to do something with, and peanut butter goes pretty awesomely with banana, so I got creative. The added benefits of all the omegas, protein, fiber, and minerals from the nuts make these cookies especially healthy. Walnuts are especially beneficial for brain development and function, and those candied walnuts really make them yummy, so don't leave that out unless you want them to be completely sugar-free. Of course, you could probably make them candied with honey instead. Let me know how that goes if you try that!


I was happy to see that Lily really enjoyed these cookies. She loves treats, but- like most parents -I don't want her eating a lot of sugar. These cookies are the perfect fix for your little sweet tooth- whether it be your child, or yourself! We even had them for breakfast without feeling guilty about it ;) The only thing I would change next time is either add more banana or ease up on the nuts, because the banana flavor was a bit subtle. Other than that, this recipe is a keeper!

Now, here are the most clicked-on fall features:


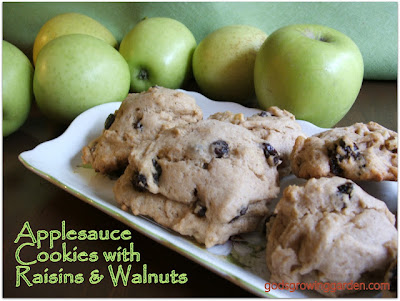
These tasty-looking cookies made with apple sauce, walnuts, and raisins are the perfect healthy treat to satisfy your fall sweets craving! Thank you, Angie from God's Growing Garden!


Holli from Full Hands, Full Heart had a wonderfully informative post about choosing allergy-friendly treats to give out to trick-or-treaters this year. I was especially glad she posted this since I often try to choose allergy-free treats myself! Thanks, Holli!


And we also have another adorable and creative costume from Carpe Diem who has lots of fun DIY Halloween costume ideas on her blog, so please check her out! I really liked this costume in particular because it was one of my first Halloween costumes when I was a little girl, and my mom made mine too! I'll have to dig-up a picture to share ;) Thanks, Ana!


And the most clicked-on features over all were:


Thanks, ladies! I can't wait to see what everyone links up this week!


Now on to the party!!!

Just follow these simple rules:


1. Link up something sweet to really WOW us all- your blog, Etsy store, Pinterest, Facebook, whatever you want! 
2. Link-up as much as you want and please follow me if you are not already. Leave me a comment if you are a new follower so I can follow you back!
3. Don't forget to hop around and say hi!
4. Share my button to get more people to join us (not required, but it would be nice!)

Healthy Mommy, Healthy Baby

Friday, September 21, 2012

Sweet Saturday #20: Raw Chocolate Banana Tart

For today's post, I'm sharing a really yummy recipe adapted from Good Girl Gone Green's blog. She always has such delicious recipes made with mostly (if not all) raw ingredients. You should definitely go check her out!

Anyway, when she linked this recipe up to Sweet Saturday last weekend, I just had to try it. I had most of the ingredients already, and what I didn't have, I improvised. I also had 2 ripe bananas needing to be used, so I tossed those in too. It came out phenomenal! The only thing I would do in the future is add some honey into the crust because I found it a little bland, but that's just me :) Other friends who tried it said they liked it just the way it was (yes, was, because this baby is gone!).


Raw Chocolate Banana Tart
(serves 8-12)

For crust:
1 cup nuts of your choice, such as almonds or pecans (I used a combination of almonds and cashews)
2 tbsp shelled hemp seeds
2 tbsp flax seed (I used some that were already ground)
1/2 cup coconut oil
1/3 cup shredded unsweetened coconut

For filling:
2 ripe bananas 
1/2 cup raw cacao or cocoa powder (I used cocoa)
1/4 cup honey, agave, or maple syrup 
1/4 cup coconut butter or oil (I used oil)

Note: If possible, soak nuts for up to 4 hours before using. I only soaked them for about half an hour, and everything turned out fine.  

Place nuts, coconut oil, and shredded coconut into food processor and blend until it is a fine crumble. Pour crumbs into a 8' or 10' pie pan and press into the bottom of the pan to form a layer, then place into freezer to set.


Looks like a beach...

Next, melt the coconut butter or oil if it is not melted already. You can keep things raw by melting it in a food dehydrator if you have one, or placing it in a small bowl in a larger bowl of warm water. Once melted, mix the ingredients for the filling together in the food processor, except for one of the bananas, until smooth.


Take the nutty crust out of the freezer, and spoon or pour chocolate banana mixture onto it, spreading it so that about an inch of the crust is still visible. Slice the reserved banana up and place slices on top of tart. Place in freezer until it sets, for about 1 hour (could very well take less, but an hour is for sure). Allow to defrost a bit before serving.


The one thing with placing the sliced banana on top is you have to keep the tart in the freezer once it's done, as to prevent them from getting all brown and gooey. If you'd rather keep it in the fridge so it doesn't take long to defrost (and easier to slice right away!), just don't put banana on top. It will still be beautiful and delicious!

Some other things you could use as toppings are:
  • sliced strawberries
  • blueberries
  • raspberries
  • sliced or crumbled nuts
  • shredded coconut
Just to name a few!

Eating raw helps to contain all natural enzymes present in food, which would be decreased or destroyed from cooking. These enzymes help our bodies to absorb the nutrients found in foods. Cooking food can also cause harmful compounds to form- especially if you burn or overcook something -that can be cancerous.  

In this day and age, it's difficult to go completely raw, but it's good to eat as much raw foods as possible, especially fruits, vegetables, and legumes. This tart will enable you to eat healthy and raw without having to lose the enjoyment of eating! Good Girl Gone Green has TONS of fantastic raw food recipes on her blog, as well as information about choosing a healthier raw lifestyle, so do take a look if you are curious about eating raw! 


OK- now it's time for the hop! Our guest-hostess today is April from April's Country Life Blog. She has the most adorable tea party treat recipes and other fun country-style tidbits. Please follow her and show her some love! 

I especially liked this fabulous cake she made for her daughter's birthday !

Just follow these simple rules:

1. Link up something sweet to really WOW us all- your blog, Etsy store, Pinterest, Facebook, whatever you want! 
2. Link-up as much as you want and please follow April's Country Life Blog and me if you are not already. Leave me a comment if you are a new follower so I can follow you back!
3. Hop around and say hi. 
4. Share my button to get more people to join us (not required, but it would be nice!)

 
Photobucket
<a href="http://jessica-healthymommyhealthybaby.blogspot.com/" target="_blank"><img src="<


Photobucket" target="_blank">Photobucket

Monday, July 30, 2012

Meatless Monday: Frozen Tahini-Banana Bites

Every so often I stumble across a recipe that gets me really excited. The requirements for such excitement usually are:
  • unusual prepartation or ingredients
  • uses ingredients in a way I never thought of
  • is not only delicious, but also healthy!  

And I get especially excited when it's an easy-to-make dessert that is sugar-free and I just so happen to have all the ingredients readily available! 

I came across the recipe for Frozen Yogurt Tahini Banana Cups (what a mouthful!) via Simple Living with Diane Balch (currently my favorite food blog, I might add!) when Fox in the Kitchen linked it up onto the Foodie Friday blog hop. Fox in the Kitchen has a wealth of awesome recipes on her blog, so do check her out, and she based the recipe off of the vegan version from The Veggie Nook (lots of good stuff there, too!). And she got the recipe from Sketch-Free Eating, a blog that has many amazing raw-based recipes, and they got it from...somewhere. I couldn't find the original recipe on their blog, they have way too much amazingness on there that easily distracts me...

SO, with all that being said, you know this recipe has to be awesome if so many people felt the need to keep passing it on! I made a batch for a Sunday afternoon gathering, and I'm sorry to say they did not go over as well as I'd hoped, although I found them to be so yummy and delicious that I ate half the batch myself. They are lightly sweetened and just melt in your mouth! Not everyone is as enthusiatic about healthy-eating as I am. That's why I am so grateful for my blogging community that can appreciate recipes like these, at least I hope so...

I had the cute Disney cupcake liners left over from Lily's 2nd birthday party :)

Frozen Tahini-Banana Bites
(this is the exact recipe from Fox in the Kitchen, but I just think that title is less of a mouthful!)

Ingredients:

1/2 cup of cold-pressed coconut oil
1/2 cup tahini
1-2 ripe banana
1/2 cup plain regular or Greek yogurt 
4 tbsp honey or agave (you can use less, but I thought this was the perfect amount)
1 tbsp raw sesame seeds
Pinch of sea salt
24 blueberries+ for topping (optional)
24 cupcake liners 

Note: the recipe from Fox in the Kitchen says this makes 2 dozen, but I was only able to make half of that with this amount. Perhaps I used too much batter per cupcake cup, or perhaps I just used larger-sized cupcake cups than she did, but if you want to make the full 24, I suggest not to be too generous with filling each cup with the mix.

What I used

Combine the coconut oil, salt, honey or agave, and tahini in a small bowl; it will work better if the tahini and coconut oil are softened or melted. Next, add the yogurt until well-combined. Slice the banana(s) into 24 slices. Spoon some of the mixture into each cupcake liner, then place a piece of sliced banana on top, sprinkled with some of the sesame seeds. Place cupcake cups on tray in freezer and freeze until batter is set, for about 5 or so minutes.

The batter
After first freezing phase

Take the tray out of the freezer then spoon the rest of the batter on top. Sprinkle with sesame seeds and then place tray back into freezer. Allow treats to freeze for at least one hour before serving.

Now, to "add a little something", I placed a single, fat blueberry on top of each treat to make it look a little more appealing. I think they came out cuter-looking that way, and you can of course get even more creative with whatever you choose.  


Another thing I did to make things more fun was to put blueberries in the middle of one of the treats for one of the kids to find. Whoever got the treat with the blueberries in the middle won a prize! (In this case, my friend's daughter found them and she won a word card game. She was very pleased with this:). 

After taking my first bite, I thought of so many other creative ways you can mix this recipe up. Here are some suggestions:
  • use peanut or almond butter in place of tahini
  • add raw carob or chocolate shavings as topping
  • add extra fruit to the middle or top
  • mix chocolate, vanilla, almond, etc. flavoring into batter
  • put jelly in the middle

I am going to try and make them with peanut butter and chocolate next time! They may go over better with the pickier eaters in my life that way. Plus, how can such a flavor combination go wrong?

The general consensus of this recipe among my family and guests was:

Friend 1: "Good, but weird."
Friend 2: "Tastes like halvah; could use more banana."
Daughter of friend 1: "No thanks." (she's vegan)
Daughter of friend 2: "Yum." (she found the blueberries)
Lily: peeled off the banana and left the rest
Paul: "Yuck!"
Me: "Yum, yum, yum, I'll eat the rest!"

I hope the mixed response does not deter you from trying this if you're curious and especially if you're passionate about raw food and healthy eating. This is super-easy and cheap to make and definitely a much better alternative to store-brought popsicles and ice cream. 

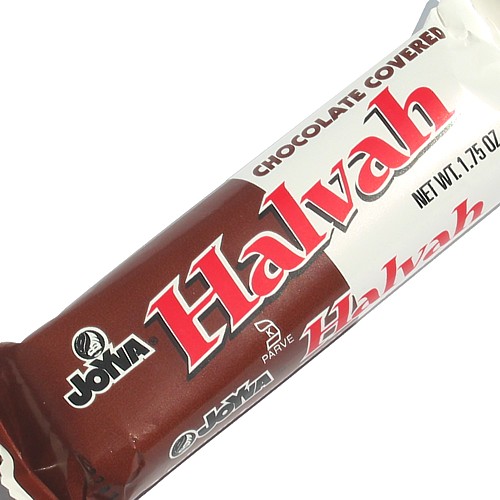
Tahini is an incredibly tasty and versatile ingredient that I don't think is used much at all in the western world. It is a very popular condiment and ingredient in parts of Africa and the Middle East, used as a sauce in many yummy dishes. Tahini is essentially sesame paste; when mixed with water and a little salt, if makes a salty, nutty sauce that can be used as a topping on things like tofu, chicken and vegetables, or as a great salad dressing. This is the first time I've seen it used in a dessert other than Halvah. If you don't know what Halvah is, it is like a Turkish candy bar (pictured below). 

Halvah can also refer to any sweet, dense sesame seed treat, but this is the most recognized and commercial version in the West

Sesame seeds contain an abundance of vitamins and minerals such as copper, manganese, calcium, iron and vitamin B1, plus much more! That's a lot for such a small seed. These nutrients can help heal and prevent ailments such as arthritis, colon cancer, and osteoperosis. They also help to lower cholesterol and support bone health.

Have a happy Meatless Monday and do let me know if you try this unique recipe, and also if you decide to pass it on as well :)


Monday, July 23, 2012

Having a Lazy Day....

Well, not exactly LAZY, but too lazy and with too much else to do to post anything good here. Plus, I did not make anything for Meatless Monday over the weekend...but, I will tonight! So, please check back for tomorrow as I will be featuring one of the delicious recipes that was linked up here at Sweet Saturday over the weekend! Could it be yours??? Find out tomorrow!!


Speaking of Sweet Saturday, thanks for the awesome turn-out yet again! And a special thanks to Mary at Mary's Kitchen, our guest-hostess for the weekend, who made it even better. Take a look at her lovely blog if you have not already, she has some really great recipes there!


What did you/are you making for Meatless Monday? Tell me in the comments, and let me know if you'd return here to link-up your MM recipe as I am considering bringing back my Meatless Monday linky if enough interest is expressed....


Have a great day and thanks for stopping by!


Should I bring it back???

Thursday, April 26, 2012

Traditional Pork Bacon vs. Turkey Bacon


I haven't always abstained from eating pork.

When I was young, I was raised eating pig meat. And like most people, I loved it. I loved pork chops, I loved ham, and I loved bacon. But, then I got to learn where bacon comes from and got to meet cute little pigs in person, and eventually I just couldn't eat them anymore. I have an early memory of meeting a cute little piglet on a class trip to the farm in the first grade. I feel this memory has helped to instill the negative feelings I have towards slaughtering these darling creatures.

For a long time meat wasn't on the menu at all, but then I abandoned my vegetarian diet once again and started eating red meat and poultry once again. I still won't eat pig, but sometimes I catch a whiff of bacon frying and can't help but desire a taste. 

Then last year I was introduced to turkey bacon. I had known of its existence, but I was afraid it just would not compare and make me miss traditional pork bacon all the more.  Guess what- I was mistaken! It's great! It tastes very similar, and much less fatty! 

Now you too can have your questions and concerns answered if you've been thinking about making the switch, just read on!

Q: Why is turkey bacon better for you than "regular" bacon?
A: It has far less saturated fat and calories than pork bacon.

Q: But, what about the often higher sodium content?
A: Even though in most brands of turkey bacon there is a higher sodium content, the benefits of eating less saturated fats far outweighs those of eating less salt. There are even brands available that should have less salt than others, just read the labels. If you have a problem with high salt intake, you should be cutting back on salty meats to begin with. Everything in moderation!

Q: What else should I be aware of when choosing turkey bacon over pork bacon?
A: Choose organic over conventional as a healthier choice that is also more sustainable, and also look for "nitrate-free." Nitrates when cooked at temperatures high enough to be burned can cause cancer-causing carcinogens to form. Eating turkey also leave a slightly lighter carbon footprint on the planet. 

Q: How do I cook turkey bacon?
A: You can cook it the same way you cook regular bacon- by frying it to desired crispiness, or by baking it. Baking it is healthier and less greasy, plus can make it even crispier if that's how you like it! Cook in oven at 400 degrees for 10 minutes on baking sheet, turning once half way through.  

If you switch to turkey, you will see it is just like using pork bacon, and you will be helping your health and the planet :) Of course, simply cutting back on meat or out of your diet completely is an even better choice, but I think most people who read this blog are omnivores! 

Pigs are also treated very poorly in factory farms, to an extent that would break any person with a conscience's heart. They are kept in cages where they can barely move, just to be fattened up before their slaughter. Piglets are taken away from their mothers just weeks after birth, only to be crammed into other cages just as their mothers were. The air is over-polluted, the animals suffer from disabilities due to lack of exercise, and the environment not only breeds poorly treated animals, but poorly produced food for consumption. Just read here and see if it doesn't make you reconsider your supermarket shopping list. 

This is not to say that turkeys are treated any better, but if you are a meat-eater and want a healthier choice, turkey is the way to go. Choosing organic, cage-free, antibiotic-free turkey will help to ensure you are getting the best offering out there.

Currently, my favorite way to enjoy turkey bacon is lightly frying it up in a pan then sticking it in between 2 slices of multi-grain bread with smoked cheddar. Grill or fry in pan- yum! Another yummy way is to wrap up asparagus spears in it and bake. Click image below for recipe.


Have a good weekend! Check back soon!


Sunday, February 12, 2012

Meatless Monday Blog Hop #3 with Chia Seed Pudding

You probably read the title of this post and thought: "What? Chia seeds?" And then you probably thought of Chia Pets and "ch-ch-ch-Chia!" 


Ah, memories. So glad I could bring that back for you. You're welcome :)


But, I'm not here to talk about "The gift that grows!" I'm here to talk about the amazing health benefits that chia seeds provide, benefits that are largely ignored by this country, as you can see by what we do commonly use them for. Yes, they're good for sprouting, but the way I like to enjoy them is in pudding. Chia seed pudding is sort of like rice pudding, only much easier to make. Easier meaning NO COOKING REQUIRED. That's right! Sooo easy. Instructions for basic chia seed pudding below...


Basic Chia Seed Pudding


1/2 cup chia seeds, white or black
2 cups almond, soy, or coconut milk (you can use cow's milk, although I highly recommend against it in order to keep it vegan as it is done so traditionally. Use organic milk if you really have a thing against the alternatives to cow's)


Pour chia seeds into a bowl large enough to hold them and the milk. Pour milk on top and mix with a fork until well-coated. Allow to sit for at least 2 hours before consumption. I enjoy them best after they've sat overnight and are extra gooey. While the chia seeds are soaking, they will start to expand and the mixture will take on a gel-like texture. The mixture will turn a purplish color and the seeds will look like they have a clear coating around them. It will not look very pretty, but you can make it look nicer by adding fresh fruit! 


the end result


The taste is almost non-existent, but it's the texture that I really enjoy. It's like a rice pudding with a creamy, light, delicate nutty flavor. I would recommend using vanilla-flavored milk if you want it to be sweeter. You can also mix in a 1/2-1 tsp sweetener, such as agave syrup or stevia extract. 


the brand I used


The main purpose of chia seed pudding is for health purposes. Chia seeds provide an abundance of omega-3 fatty acids, antioxidants, fiber and calcium. They provide lots of natural energy and help balance blood sugar. They are also quite inexpensive, although not always easy to find. I have a local health food store that carries them and you can find them at places like Whole Foods and Trader Joe's. You can also order them on vitacost.com. Read here for more info on the amazing chia seed.


Here are some delicious add-ins for your chia seed pudding:

  • fresh fruit, such as banana, strawberries, and blueberries
  • raw nuts, like cashews, almonds, and macadamias
  • dried fruit, such as raisins, blueberries, and cherries
  • vanilla extract
  • raw oats
  • cinnamon 

Here is another recipe for a yummy-sounding Chia Porridge from the back of the package I bought:


1 tbsp chia seeds
1 cup water
5 tbsp oats
1/2 banana, sliced
1/2 tsp cinnamon
1 tbsp agave nectar
2 tbsp chopped walnuts
1 oz coconut milk
Pinch of sea salt


Bring water to boil. Add all ingredients except for the coconut milk to the water and stir for about 5 minutes or until the texture thickens and is to your liking. Serve with the coconut milk poured on top.


SOUNDS GOOD!


This pudding is the perfect alternative to sweet treats. Your family (including yourself) may think it sounds and looks weird, but just give it a try and I think you will be pleasantly surprised. When I first tried this, it was brought to a church function by a close friend and served with banana. Many looked at it with a "WTF?' look on their faces, but everyone enjoyed it! Lily likes it with fruit mixed in and Paul likes it sweetened up. What style will you try?


Now it's time to link-up something yummy and meat-free. Since I shared a snack/treat today, you can link something like that up too. Of course,  you can link whatever you like, just please only link up vegetarian recipes! And please follow your hostess and visit some of the other blogs and leave some love! With the soon-to-be-disappearing Google Friend Connect, I suggest you start following me and others with Linky Followers.


Have a good week!


Sunday, February 5, 2012

Meatless Monday Blog Hop #2: Juicing for the Whole Family

Something I like to do- especially in preparation for spring -is to juice cleanse. If you have a good juicer, it's relatively easy to do (although clean-up not so much) and what can be better than freshly squeezed juice? Here are some of my favorite combinations:

1-2 Granny Smith Apples
3 carrots

2 carrots
1 red apple (like Braeburn or Red Delicious) 
1 stalk celery
1 small piece fresh ginger (about 1 tsp)

1-2 cups cubed watermelon
1 small/medium sized aloe vera leaf (skinned)
Sprig of fresh mint

1-2 carrots
1-2 apples (any type)
1 handful spinach


These are all healthy and delicious combinations that we have tried and enjoyed in my home. We have a Juiceman Jr. that a dear friend of mine was thoughtful enough to give me while I was pregnant with Lily. The idea behind that being that it would help me lose any unwanted leftover "baby weight" I'd accumulated and also help me get back onto a healthy diet if need be.

Best. Gift. Ever.

Luckily enough for me (and please don't be jealous!), I was able to lose the extra weight after giving birth pretty quickly, but having the juicer was quite nice. We enjoyed many glasses of watermelon juice and aloe vera with fresh mint from the garden, and freshly squeezed orange, apple and carrot that summer following my little child of spring's birth :)

Carrot and Granny Smith apple juice

Lily likes the juice too, as long as fruit as involved. She is not too crazy about vegetable juices (neither am I...)- not even carrot! But, she loves some freshly juiced oranges and apples.


You can juice just about anything, although a lot depends on what kind of juicer you have. If you don't own a juicer, here are some great ones that can help you get started. Juicing benefits in many, many ways. It helps to cleanse and detoxify your body from the day-to-day stress and toxins we put into it. It provides healthy sugars and natural energy. It provides a multitude of nutritional benefits, including antioxidants, fiber, and phytonutrients. You can use it to help and maintain any function of the body, depending on what fruit or vegetable you choose to juice. 


One thing you should keep in mind when giving fresh fruit or vegetable juice to a small child, is that there is a large amount of high-energy natural sugars in most of them, especially in carrots, apples, pears and pineapple. You should only give children under 5 years old about 4 ounces  of fresh juice at a time; otherwise, the strong sugar content may be too much for them to handle and they will surely be bouncing off the walls! Also remember that these are healthy, beneficial sugars, but it is one of the good things you can have a bit too much of. It is not the same as when you buy juice in the store that is watered down, overly processed and pasteurized. Six ounces of fresh fruit juice is equal to one adult-sized serving of fruits and vegetables, so you'll want to give children a little less, depending on their weight and age.

I hope you enjoyed this change of pace with today's Meatless Monday recipes. You may not own a juicer yet, but this may entice you now. Once you drink fresh juice, it's hard to go back to the bottled kind!

Now it's time to share! Please link up a meat-free recipe at the bottom and visit some of the other blogs too. It can be a recipe for anything- soup, dessert, beverage, entree, whatever -as long as it doesn't use meat products. You can also link up multiple recipes if you'd like. Just follow me, your hostess, and please pass along.


Wednesday, December 28, 2011

Vegan Sugar Cookies


So. I’ve been busy…again. More like extremely tired on Monday after all the holiday chaos and didn’t feel like doing much of anything except watching Lily play with her new toys, which she actually did very little of. The child got plenty of new toys- puzzles, dolls, books, Radio Flyer Inchworm among them –yet she preferred to hang on Mommy and/or climb all over the furniture instead. Actually, she did quite enjoy the stickers Grandma got her, although she needed Mommy to peel them off their paper backing so she could make a huge sticker mess with them. At least it kept her busy for a while.

OK, enough venting. Let’s get down to the healthy, animal product-free recipe I was supposed to post on Monday. I made these dairy- and egg-free cookies because my niece is allergic to eggs and one of my BFFs is lactose-intolerant. Plus, I never made a successful batch of vegan cookies and I wanted to give it a go again. The first time around this time, they didn’t turn out so hot; the dough came out really wet and additionally I added food coloring (plant-derived, of course), which made them brown instead of red and pale green instead of dark green. That’s the problem with natural food coloring- it doesn’t last long and it takes a lot of food coloring to get it to the color you want. It worked well with the frosting I made for Lily’s birthday cake earlier this year, but not so much for cookie dough. Oh well, live and learn.

Anyhoo, the second attempt came out much better, although I will admit I am not completely satisfied, only because I wanted them to taste the same as cookies that are made with butter and eggs. I was told that that may not be possible since those flavors simply cannot be replaced with substitutes of margarine and almond milk. Paul liked them and so did my niece, however. Unfortunately, I have not had the chance to deliver them to my BFF since she had to work on Christmas when I had originally planned on giving them to her, but I think she will be happy enough just to be able to eat a cookie again (her dairy intolerance is a recent development).

Vegan Sugar Cookies

Ingredients

3 1/4 cups all-purpose flour
1 1/2 tsp. baking powder
1/2 tsp. salt
1 cup margarine or other dairy-free spread
1 1/4 cups granulated sugar
1 tsp. vanilla extract
1/4 cup almond milk

Sift together the flour, baking powder and salt in a large bowl then set aside. In a different bowl, cream the margarine and sugar together until fluffy. Add the vanilla extract and then the almond milk until well combined. Slowly add the dry ingredients to the almond milk and margarine mixture until dough is formed. Divide dough in half, then press onto separate plates like thick discs and refrigerate until dough hardens. This dough is extremely soft with the almond milk in it, and I found it best to refrigerate over night. If you have time to make ahead, I recommend doing so, otherwise keep it cold for at least 1 hour.

Preheat the oven to 375 degrees then get the dough out. If you want to cut into shapes, lightly flour a cutting board and roll the dough out to about ¼” thick. Cut your shapes out then transfer them to ungreased cookie sheets or silicone baking mat. I have never had luck with cutting shapes out of cookie dough, and with this dough being softer than usual, I had no luck this time either, but if you want to take a chance and you do have the skills, go ahead! I ended up just rolling the ball into little 1” balls and placing them on the baking sheets, then flattened them into discs and topped them with red sugar sprinkles. Stick in the oven on center rack for 10-12 minutes until golden and lightly browned on edges.


Once the first half of the dough is in, you can bring out the second and get it ready to put in the oven if you had enough baking sheets; otherwise, wait until the first batch is out and cooled, then reuse the same sheets after rinsing. Once all the cookies are made- and you should have about 4 dozen with this recipe –allow them to cool for at least half an hour before decorating if you plan to do so. The blog where I got the recipe I based this off of included an egg-free icing recipe you can try too. Let me know how it goes!


I hope to one day be better at making shapes and decorating cookies and cakes and such. For now, a smidgen of colored sprinkles is what you get out of me.


Food allergies are weird to me since I don’t have any. Actually, I do get queasy from shell fish like clams and mussels, and I am told that counts as an allergic reaction, but my upset stomach is far from life-threatening like some allergic reactions can be. I had a friend who couldn’t even be within a few feet of peanuts or he’d start to get red and swollen-looking, and I had another friend who after taking one bite out of a fallafel wrap for the first time- and being unaware that it contained her nemesis chick peas, had her face blow up like a balloon in a matter of seconds. I often ponder (well, maybe not often) why certain people have food allergies. Why would nature cause this, and why only in certain people and with certain foods? Is it something genetic? Something inherited from our mother’s diet while we were in the womb? To me, it’s just so odd to think that food that is otherwise harmless and nutritious could cause a fatal reaction in someone. Do you have a food allergy or know someone who does? How do you/they deal with it? Is it a severe allergy, or just a mild one?

Note that I used almond milk in this recipe, but you can use any lactose-free alternative, such as soymilk, rice milk or simply lactose-free cow’s milk. I always thought that was weird too, but I’m not going to get into that one right now. Seeing as how this is an allergy specific recipe, it’s possible the person you’d bake them for is allergic to almonds if they have a nut allergy, so make sure you know ahead of time.

Speaking of almond milk, almond milk is awesome. I don’t drink any other kind of milk as long as I have a choice anymore. It tastes so delicious and is really good for you. I fondly remember the first time I tried it and I recall giving quite the reaction of being pleasantly surprised. I had no idea it would taste so rich and creamy, unlike soy and rice milk, which I generally find bland and watery, especially now that I’ve tried almond milk.

Almonds are full of nutrients like manganese, vitamin E, and copper, to name a few. They are especially good at helping to lower your cholesterol for a healthy heart, as all nuts do, but almonds contain an especially high amount of magnesium and vitamin E that aid in doing so. They offer, according to WHFoods.com, “double-barreled protection against diabetes and cardiovascular disease.” They are also good at helping you lose weight with their healthy fats, help prevent gallstones, and provide you with extra energy. Almonds do all this and more, so click a link to read all about the awesomeness of almonds!

As you may have already guessed, these cookies are totally kid and toddler friendly :)
Related Posts Plugin for WordPress, Blogger...