Showing posts with label strawberries. Show all posts

Friday, July 13, 2012

Sweet Saturday #13: Strawberry-Kiwi Lemonade!

Once again, we had a great turn out last Sweet Saturday. Yay! Thanks to everyone who linked up! Let's make it BIGGER this time, ok? I'm officially addicted to having a large turn-out at my link parties now :) ...


Today's recipe was inspired by this tasty-looking treat I came across last week that I just had to try: Strawberry Lemonade from Addicted to Recipes. Mine is a little different because I used less sweetener and added kiwi since I had 2 that were a bit overripe and needing to be eaten. The result came out REALLY GOOD, so I hope you like it enough to try it. Let me know if you do!

What a pretty color, right?
Strawberry-Kiwi Lemonade
(makes 1 pitcher full)

Ingredients:

3-4 lemons
1 cup strawberries
2 kiwis
1/2 cup sugar or 1/3 cup stevia
1 1/2 cup water
1 small aloe leaf
4 cups water

Heat the sugar or stevia with the 1/2 cup of water over medium heat until dissolved, stirring occasionally. Remove from heat once sugar or stevia is completely dissolved and allow to cool. Meanwhile, juice the lemons and set aside. Hull and halve then quarter the strawberries then put into blender with 1 cup if water. 

Strawberries in water
Slice the aloe leaf lengthwise so one side of the leaf exposes the gel. Scoop the gel out and add it to the strawberries and water. Next, add the sugar syrup and hit puree. Lastly, add the lemon juice and water. You can just mix them together with the strawberry concoction if your blender has a "Mix" or "Stir" setting, or just pour everything into a pitcher and stir it up that way.


It will look like this once you blend it all up

And you may have a mess to clean up that looks something like this

You can serve this sweet and refreshing drink with fresh fruit or mint as garnish. Additionally, you could also add some ginger and/or cucumber to the mix, similar to the last lemonade recipe I posted. I recommend allowing to sit your fridge overnight, or at least for a few hours, before serving, to allow the flavors to blend properly. I know my first sip was almost too sour-tasting, but the next morning when I had a glass it was perfect!


This lemonade is particularly healthy and detoxifying with the added benefit of aloe. Aloe is already largely well known for it's cleansing benefits, as well as its soothing benefits when used topically on burns. But, did you know aloe also helps to halt tumor growth, lower blood sugar and cholesterol, prevent kidney stones, and boost cardiovascular performance, among many other things? Read this link to learn more!

This is terrific punch to serve to your family, friends, or at a party. It will be a hit with everyone, especially the kids. Adding the kiwi to this makes me reminisce about the Strawberry-Kiwi flavor Snapple used to make, but this is so much better! Better tasting and better for you ;)

Notice I added aloe gel to this; I use aloe all the time. It's the best burn treatment and can easily be added to any fresh juice of smoothy. But, alone it tastes rather bitter. You can even use it as a moisturizer and to speed up the healing process on cuts and scrapes by apply a little bit right onto the wound. Aloe truly is a wonder plant!
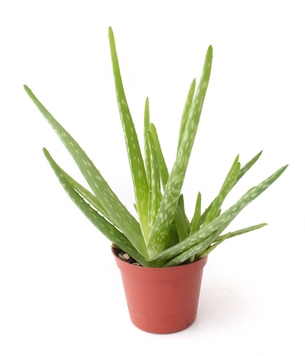
This is how one of my plants looks when the leaves aren't all chopped off. This image is courtesy guide-to-houseplants.com

I will warn you of one thing when consuming aloe, though: it's diuretic, so don't give too much to little ones unless you want them to poop a lot! Just a tip ;)


OK, now it's your turn! Follow these simple rules:

1. Link up something sweet to really WOW us all- your blog, Etsy store, Pinterest, Facebook, whatever you want! 
2. Link-up as much as you want and please follow me if you aren't already, and our guest-hostess, Mary, at A Day in the Life. Leave us a comment if you are a new follower so we can follow you back!
3. Hop around and say hi. 
4. Share my button to get more people to join us (not required, but it would be nice!)


Please show Mary and her lovely blog lots of love, she's new to the blogging scene- plus she has really cute twins for you to ogle!

Thanks so much for linking up, I really do love the weekend even more because of this :)


Photobucket
<a href="http://jessica-healthymommyhealthybaby.blogspot.com/" target="_blank"><img src="<Photobucket" target="_blank">PhotobucketPhotobucket />" alt="Healthy Mommy Healthy Baby" width="125" height="125" /></a>

Wednesday, March 28, 2012

Strawberry Cream Tiramisu + Pics of the New Casa

So...I was going to save this quick little recipe for Sweet Saturday, but I think I can find something else to post then (and let's hope I actually do post!). I made this simple little strawberry dessert when  my parents visited us as our first official dinner guests. My mom actually made the dinner, a delicious roast curried chicken with potatoes and carrots, so I decided to whip something up for afterwards.

Here it is, and it's not exactly healthy, but there's less sugar in it than some cakes. You can make it healthier if you can find some whole wheat ladyfingers (maybe at Trader Joe's or Whole Foods? Don't have those fabulous places by me). 

Strawberry Cream Tiramisu


Ingredients
(serves 4)

1 cup fresh strawberries thinly sliced
1 1/2 cup whipping cream
1 tbsp powdered sugar
1 tsp vanilla extract
16 ladyfinger biscuits

Pour 1 cup of cream into a large bowl and beat until stiff peaks form. Mix in the vanilla extract and sugar. Pour the remaining 1/2 cup of cream into a shallow dish wide enough to hold at least one ladyfinger. Have a separate casserole dish or cake tray ready to place the biscuits on that is long enough to line eight of the biscuits on. Carefully dip each ladyfinger into the cream, allowing to soak for about a minute each, and then place onto the tray like in the picture below, only making one row and not two (make two rows if you want to make eight servings).


Photo credit: cookwithsara.blogspot.com

If I had known how awesome this was going to turn out, I would've taken step-by-step pictures! 

Next, layer some of the whipped cream on top of the cream-dipped biscuits, then put a layer of the sliced strawberries on top of that. Add a little more whipped cream on top of the strawberries to help the next layer of ladyfingers stick on top, but don't add too much unless you like A LOT of whipped cream! Dip the remaining eight ladyfingers into the rest of the cream (add more cream if needed) and repeat the whipped cream and strawberries layering process. Refrigerate for at least one hour before serving for best results. Voilá- dessert!


This is super simple to make and should be a hit with everyone. It takes less than thirty minutes to make and best of all- no baking! Anyone can make it, really! This was a hit with everyone at our little dinner party. Lily loves anything with strawberries in it :) Who doesn't?

Strawberries are super awesome for so many reasons. First of all, they are one of my fave fruits. Secondly, they have high amounts of vitamin C in them. Thirdly, they also provide anti-inflammatory support, anti-oxidant protection, and improved blood-sugar regulation! Sweet! 

This is a great spring/summer treat and I hope you like it!
Plus, here are some pictures of the new house, as promised. Interior is still not quite ready to be presented, so I hope you are all happy with these exterior ones for now :) 

love the happy daffodils :)

The weather has been so nice (at least is was) and Lily was really enjoying it.

the wind was so strong on Monday that it blew that pink tent you see in the background right away!
getting a driveway put in soon too
She sure loves pushing her stroller around, whether dolly is in it or not
don't mind the mess of boxes back there :P

There you have it. We are now in a quiet little suburban town. It's a nice change from our previous more urban town that we were starting to feel less safe in. Lily is quite happy :)


I'll have another fun recipe for Friday, so be sure to check back!


Friday, February 17, 2012

Sweet Saturday Blog Hop #3 THIS CHICK IS BANANAS!

Today I'll keep this short and sweet (see what I did there??). Right now I'm watching Lily build with her foamy blocks in a tub full of bubbles, and once she's done and dressed for bed, I'll be getting ready for GIRLS NIGHT OUT! Whoo-hoo! So, I figured I'd better post this early since I made need time to re-cooperate tomorrow and not worry about blogging. Let's consider this hop "Sweet Weekend Blog Hop" :)


Today I'm sharing some cute pics of Lily eating a banana, and our favorite smoothie recipe :D


It was her first time eating a banana with the rind on it


Strawberry-Banana-Peanut Butter Smoothie

Ingredients:

1 banana
1/2 cup strawberries
1/2 cup plain yogurt
1/2 cup milk, almond milk, soy milk, or coconut milk
1 big spoonful of peanut butter

Throw it all in your blender and blend away! This makes 2 large servings or 4 small servings, so add ingredients accordingly. Enjoy!

Now it's your turn to share! Link whatever you like as long as it's something sweet. It can be a blog post, an Etsy shop, your lovely website, your FB page, whatever! Link as many as you like, just don't link the same thing more than once, thanks! And please just follow me, your hostess, preferably by Linky Followers since GFC is ending very soon. Or better yet, subscribe! Have a great weekend!


Photobucket
<a href="http://jessica-healthymommyhealthybaby.blogspot.com/" target="_blank"><img src="Photobucket" alt="Healthy Mommy Healthy Baby" width="125" height="125" /></a>
Related Posts Plugin for WordPress, Blogger...