Showing posts with label vitamin a. Show all posts

Monday, November 19, 2012

Meatless Monday: Yummy Side Dishes

This super-yummy potato side dish recipe from Little Mommy, Big Appetite was recently shared here a couple of weeks ago, and I just had to try it. She has so many delicious recipes to choose from, but this one is already a new favorite in my home now. I changed it up just a bit according to the ingredients I already had at hand, but I'm sure any way you make something with the words roasted, cheese, and potato in the name, it will turn out good!

I also came up with a new way to enjoy Brussel sprouts (well, there are other similar recipes out there, but this is my version) that I really liked and will be sure to try again. I normally just roast them with a little olive oil and salt and pepper, but this time I steamed and sauteed them. My Meatless Monday last week really felt like a gourmet meal, and I was joined by one of my besties who ate every bite up with Lily and I.


Cheese and Onion Roasted Potato Stacks
(serves 4)

Ingredients:

2-3 medium-size potatos, Russet or Idaho are good
1 small onion, grated or finely diced
4 tbsp olive oil
1 tbsp parsley flake
1/2 tsp salt
1/2 tsp pepper
1/2 cup cream cheese
Grated cheddar cheese

Preheat oven to 425 degrees. Mix olive oil, onion, and seasonings in small bowl. Clean and peel potatoes, if desired, then slice width-wise as thinly as possible. Brush bottoms of muffin tin with a little olive oil (or you can use cooking spray). Place one slice of potato in 1 muffin tin cup, then drizzle a little of the onion-olive oil concoction on top. Next, place a dollop of cream cheese on top, just about 1 tsp in size. Repeat process until 4-5 potato slices are stacked up in each muffin tin cup, topping it off with a little of the olive oil mixture and no cream cheese.


Place on center rack in oven and bake for about 25 minutes. Remove tray from oven, and sprinkle grated cheese on top of each potato stack, plus a little extra parsley. Put back in oven, and broil for 5 minutes more, or until cheese is melted to your taste. Allow to cool for about 5 minutes before serving. Enjoy!


Brussel Sprouts with Toasted Almonds and Lemon
(serves 4-6)

Ingredients

1 lb Brussel sprouts, cleaned and trimmed
1/4 cup sliced almonds
3 tbsp butter or oil
3 tbsp lemon juice
Salt and pepper to taste

Cut Brussel sprouts into quarters, like in the picture below. Fill a large frying pan's bottom with water, just enough so that the bottom is covered and is only about 1 cm deep. Place sprouts in pan, cover, and cook on medium-low for about 5-7 minutes, or until tender.  Meanwhile, you can toast the almond slices on the "Medium" setting in your toaster oven, or on a baking tray in your oven at 350 degrees until lightly browned (about 5-7 minutes).


Drain sprouts, then melt butter in pan. Put sprouts back in and saute for about 3-5 minutes. Add in the lemon juice and almonds, plus salt and pepper to taste, and stir until well-covered. Serve right away and enjoy the delicate flavor combination. 

Mommy's and Lily's plates

Potato stack cut open

If these sides don't entice you, then I don't know what will! We ate it all up and nobody complained. The cream cheese was such a nice touch to the potato stacks, I can't wait to make these again. I had three servings of the Brussel sprouts! We also had some rice pilaf from a package of Near East brand sides. I normally avoid pre-packaged foods like that, but Near East is pretty all natural to my knowledge and doesn't contain anything artificial. 

Hopefully picky eaters in your household won't have any problem with these tasty sides. Even babies over 6 months can enjoy some of the potatoes mashed-up and some extra-mushy brussel sprouts. I hope your family likes these as much as we did :)

We all know brussel sprouts are super-good for us, but they are also one of those classic ick foods we all remember mom and dad forcing upon us as kids. I have actually always enjoyed them, probably because my mom would steam and butter them until they were like buttery mush in my mouth. Yet, most kids don't like them, but that shouldn't be. They are so yummy and versatile- you can steam them, roast them, bake them, add the to soups and stews, mash them up, chop them up...really, there is just so much you can do!

They are chock full of vitamins and nutrients like vitamin K, vitamin C, manganese, and folate. They support a healthy immune system, fight cancer-causing free radicals, and also support a healthy heart and digestive system. They are in season now, so remember to have them with Thanksgiving this year!

Now it's your turn to share your Meatless Monday dish below! Share your turkey-alternatives or other yummy Thanksgiving favorites. No rules, other than please only link-up meat-free recipes. No other un-related links or I will remove them. Sorry to sound so harsh, but let's keep it true to what it is, ok? Link up as much as you want, and feel free to spread the word with the button below. Thanks, and have a great week! 
          
Photobucket

Have a Happy Thanksgiving, everyone, and be safe wherever you are! Thanks for linking-up and supporting my blog, I greatly appreciate it ALWAYS. Btw, if you missed it Friday and are still looking for an alternative to a full-sized turkey for your main course this year, here is an easy and tasty turkey loaf recipe. I'll be away for the holidays, so I may not post again today after this, but I'll do my best if I can find the time. :)


Wednesday, September 19, 2012

Whole Wheat Mango-Honey Pancakes

I made these the other day when Paul requested pancakes, and they came out so good I couldn't wait to post! Lily gobbled them up, too. These are perfect for the whole family!


Whole Wheat Mango-Honey Pancakes
(makes 6 large pancakes or 12 small, depending on thickness)

1 1/2 cups whole wheat flour
3 1/2 tsp baking powder
1 tsp salt
1 tbsp honey
1 1/4 cup milk of your choice
1 large egg
3 tbsp melted butter or coconut oil + 1 tbsp extra
1 mango, diced
Extra honey and/or maple syrup for topping

Combine all dry ingredients together in one bowl, then all the wet (except for mango) in another. Next, combine together in one big bowl.  Heat butter or coconut oil over medium-low heat in large pan. Spoon pancake mixture onto pan to form a circle shape to your desired size. Place a few hunks of the mango onto pancake batter in pan, and drizzle extra honey over it if desired, like in the picture below.


Heat for about 5 minutes, or until the batter starts to bubble, and then flip over and heat for 3-5 minutes longer on other side. Serve with mango and syrup and/or honey on top. 


YUM!!!

These were so good! I was super pleased, and so was Lily who gobbled a whole coaster-sized one up with extra mango. Lily loves mango! What kid doesn't? It's always been one of her favorite fruits, ever since she was a babe. It is also very good for her, in that it provides high amounts of vitamin C, vitamin A, fiber, calcium and so much more!

If you are better at being creative than I am, you can make cute shapes and faces with the mango pieces in the pancakes as you fry them. I think I'll try to make a Mickey Mouse-shaped one for Lily next time :)


Sunday, September 16, 2012

Meatless Monday: Grilled Carrots and Yukons

Summer is coming to an end, but with the weather still warm, last week Paul and I decided to get some grilling done before it's completely gone. I tried something new and grilled organic carrots and Yukon Gold potatoes with some unique marinades. Take a look...


To prepare vegetables:

Cut ends off of each carrot (I used 8) and shave. Thoroughly wash potatoes (I used 2 large ones) and cut into quarters. Peel if desired. 

Rosemary-Balsamic Marinade

2 tbsp olive oil oil
2 tbsp balsamic vinegar
1 tbsp rosemary (fresh or dried)

Mix all ingredients together in small bowl. Brush over vegetables with basting brush. Add extra rosemary if desired.

Curried-Maple Marinade

2 tbsp butter
2 tbsp curry powder
1 tbsp maple syrup

Melt butter (or you could use coconut oil instead) over low heat in small pan. Stir in curry to make it curry butter. Remove from heat and mix together with maple syrup in small bowl. Brush onto vegetables with basting brush. 

To grill:

Allow vegetables to marinate for at least one hour before grilling. Heat grill to 350 degrees, then place vegetables directly onto grill, or wrapped in tin foil if preferred. Heat carrots for 10 minutes on each side or until cooked through; heat potatoes 15-20 minutes on each side or until cooked through. Pierce with fork to test done-ness. Marinate once more halfway through cooking. Allow to cool before serving.

They were simply delicious! I loved how both of the marinades turned out, but if I had to choose, I'd have to say the carrots were best with the Rosemary-Balsamic and the potatoes were best with the Curried-Maple. Just delish! Paul, Lily, and I ate them all up! The carrots went the fastest, though...

This is an ideal way to serve veggies for the whole family. Each marinade is sweet and slightly spicy without going overboard, and with low calories and only natural, healthy sugars. I hope you enjoy! Serve babies over 6 months fresh veggies grilled without marinade and mashed with a fork. My niece loves them that way!

Now it's your turn to share your Meatless Monday dish below! No rules, other than please only link-up meat-free recipes. No other un-related links or I will remove them. Sorry to sound so harsh, but let's keep it true to what it is, ok? Link up as much as you want, and feel free to spread the word with the button below. Thanks, and have a great week! 

Photobucket

Sunday, August 19, 2012

Meatless Monday: Easy Old Bay-Style Sweet Potato Fries

For this Meatless Monday, I'm keeping it simple. I ate a whole lot of less-than-healthy food this weekend, mainly because it was convenient and readily available. Sneaky unhealthy food...so, this week I will be starting fresh and enjoying a nice salad for my Meatless Monday. 

One thing I did make that was wholesome and yummy were these quick and easy sweet potato fries. I've made a version of these before with Russets, but this was the first time with yams, and they came out really good! I had them with a freshly-made crab bisque which I will share with you later this week...

Don't you just love this gorgeous dish I found at a garage sale?

Easy Old Bay-Style Sweet Potato Fries
(serves 2-4 as side dishes)

2 larges yams
2 tbsp olive oil
1 tbsp Old Bay seasoning

Peel the yams, then cut into halves length-wise, and then quarters like in the picture below. Preheat oven to 425, then prepare baking sheet by brushing some of the olive oil onto it lightly. Next, line up the sweet potato wedges on the sheet like in the picture below, then brush wedges with the rest of the olive oil. Before you put them in the oven, sprinkle with the Old Bay seasoning. Bake for 25-30 minutes, or until brown and crispy to your linking. Serve with extra olive oil or other dipping sauce if desired.


And that's it! So easy! Gotta love that ;)


If you're not familiar with Old Bay seasoning, it is a combination of salt, celery seed, red pepper, black pepper, paprika, and "other" spices. That's according to the Old Bay website; according to this website, there are a lot of "other" spices in it. Not sure I can taste any cardamom or ginger, but it sounds like they would be a nice addition!

   
These fries are also kid-friendly, although kids with sensitive taste buds might find it a bit spicy with the Old Bay. For babies over 6 months, you can make them with only olive oil- they will love it! Just make sure it's cool enough before serving. They will likely only eat one or two, unless you have a big eater!

Now it's your turn to share your Meatless Monday dish below! No rules, other than please only link-up meat-free recipes. No other un-related links or I will remove them. Sorry to sound so harsh, but let's keep it true to what it is, ok? Link up as much as you want, and feel free to spread the word with the button below. Thanks, and have a great week!

Photobucket


What are you having for Meatless Monday???


Sunday, August 12, 2012

Meatless Monday: Grilled Chili-Lime Sweet Potato Wedges with Cilantro

It's been quite a weekend, yet I have somehow managed to gather the energy to write this post. Mainly, because it was such a good weekend and I am still running on the high from it, as pooped as I may also be. Also, because the yams I made for the family BBQ I had here on Saturday came out so awesome, I couldn't wait til Sweet Saturday to share them!

A few weeks ago, I asked readers to post their favorite cook-out recipes for the big family gathering Paul and I had at our place this past Saturday (that kept me so busy, too busy to blog this weekend until now!). I received a lot of delicious-sounding and looking posts linked up here, but this one stood out to me, partly for it's simplicity that packed a lot of flavor, and partly because who can resist sweet potatoes?

The recipe I decided to try was Chipotle, Cilantro-Lime Sweet Potato Wedges from Angie at Rustic Feast. Angie was a new linker at Sweet Saturday, so kudos to her for making such a great first impression! Recipe is below; I made two slight changes, neither intentional, that's just how things go sometimes when you're trying to follow a recipe- you adapt! Since it's a bit altered, I changed the title for this purpose.


Grilled Chili-Lime Sweet Potato Wedges with Cilantro  
(Serves 20! Maybe more!) 

3 lbs. sweet potatoes
1/2 cup lime juice
1/2 cup olive oil
1 tbsp chili powder
Salt and pepper to taste
1 bunch of cilantro, chopped

Scrub and then boil sweet potatoes in large pot for about 20-30 minutes. Once soft enough to pierce with a fork, remove from heat and place into ice water to cool down and stop cooking. While they're cooling, mix lime juice, olive oil, and chili powder together in small bowl. Use Chipotle chili powder if you have it; I couldn't find any chili powder specifically called "Chipotle" chili powder. Chipotle has a much smokier flavor, so I highly recommend using it if you can get it!

Once the potatoes are cooled enough to handle, peel off skin then cut into halves length-wise, then into wedges. Spread wedges onto large serving tray, then drizzle with the olive oil, chili and lime mixture until covered. Top with a sprinkling of salt and pepper (use freshly ground if possible). 

Now, here is where the recipe got altered a bit once again: I was so busy hosting the big event, that I had to have Paul's dear uncle and cousin man the grill. They were kind enough to offer, in fact, and they did a far better job than I would have! The thing was I failed to mention to them to put the wedges directly on the grill so they'd get those grill marks, and they instead wrapped them in tin foil and turned them after on each side after 10 minutes to heat them through. 

   
They still came out spectacular, however they did not have that awesome smoky grill taste or cool-looking grill marks that they could've had. In order to do it that way, place wedges directly onto grill and turn after about 5 minutes or just until they clearly have the marks on all sides (or however you prefer!). You can do either way, they will taste awesome regardless, just don't forget to top with the chopped cilantro, that really made them special!

They were a hit! Almost every single one disappeared before the day was done. The flavor combination was just the perfect balance of sweet and sour, with just enough kick for everyone to enjoy, kids and adults. I will definitely make them again! Thanks, Angie!!

Chipotle chili peppers are pretty amazing, not only tasting, but health-wise as well. They are jalapeno peppers that have been smoked (to get that wonderful smoky flavor, of course) then dried, which helps to reduce the strong heat from fresh jalapenos, making them more palatable. They are chock full of vitamin a, vitamin k, and a chemical compound called capsaicin which has been found to help reduce heart disease, stroke, and lower high blood cholesterol and sugar.

Friday I will post more about how the cook-out once I go through all the pictures. I didn't take nearly enough, especially not of the food, but there were so many incredible dishes there! I'm talking edamame succotash, pineapple-coconut fruit dip, Indian-spiced chicken, gourmet cupcakes, pasta salad....I have such a talented family of cooks, clearly.

But, here are a few "teaser" shots from the big day, enjoy ;)

A peek at my niece raiding the dessert table

Lily playing with the slip 'n slide in her own way...

My favorite pic I took of Lily in the sprinkler :)

Now it's your turn to share your Meatless Monday dish below! No rules, other than please only link-up meat-free recipes. No other un-related links or I will remove them. Sorry to sound so harsh, but let's keep it true to what it is, ok? Link up as much as you want, and feel free to spread the word with the button below. Thanks, and have a great week! (hopefully I will have my act together for this week's Sweet Saturday, too!)

 
Photobucket

Monday, July 16, 2012

Meatless Monday: Hearty Lentils

Yet another busy, fun-filled weekend has passed, and I still have a lot to do to "recuperate" from it, so this will be a quick post. 


Today's Meatless Monday recipe derived from me just using what I had readily available. I had lentils, olive oil and garlic in the pantry, and onion, carrot, and spinach in the fridge, plus some long grain rice. Here's what I came up with:


Hearty Lentils
(serves 6-8)


Ingredients:


1 cup lentils
4 carrots, chopped
1 onion, diced,
4 cloves garlic, diced
1 cup baby spinach, rinsed
2 tbsp olive oil
1 tsp salt
1 tsp pepper
1 tsp dried parsley (you can use fresh)
2 cups rice


Cook the rice according to package and set aside. While it's cooking, sauté onion and garlic in olive oil over medium-low heat in pot for about 3 minutes or until fragrant. Add salt, pepper and parsley and stir together with the onion and garlic, then add the lentils. Cover the lentils with water that is about 1 inch over them, then bring to a boil. Add more water as needed. Once the lentils are about halfway cooked (10-15 minutes), add the carrot. Bring to a boil again, then cover and cook over a high simmer until water is absorbed; add more water as needed. 


Once carrot and lentils are soft yet firm, remove from heat and stir in spinach until wilted. Alternatively, you can add the spinach when the lentils are served so it's still very fresh. Add more seasoning if desired, then serve over rice, or other grain such as quinoa. Quinoa is what I had really wanted to eat with this, but I was fresh out and too lazy to go the store! If you have fresh cilantro, sprinkle that on top. Celery and/or zucchini would make nice additions to this dish as well.


This is an easy, semi-quick meal to make that even meat-eaters will enjoy. Every ingredient is healthy and packed with vitamins and nutrients for your growing child. Most kids like lentils, but if you have a kid who doesn't, make this using only veggies or a different bean they do like. Babies 9 months and up can start eating lentils as long as it is ok by your pediatrician. 


Now, just for fun, I made this little cartoon strip of Lily discovering an ant crawling up her leg. Who says I don't have time for anything fun these days? 


Sunday, June 17, 2012

Meatless Monday: Asian-Style Noodle Soup

I hope everyone had a nice Father's Day with their dad, husband, grandfather, brother, friend, whoever this weekend. Poor Paul has a toothache, so his wasn't as grand as it could've been. We did go to a local fair and had some fun there, so I'm glad we at least did that.

Yesterday I had a craving for this simple noodle soup and decided to have it for dinner last night. It's perfect for Meatless Monday too, and you can make it in about 30 minutes! It's similar to those packages of instant ramen noodles you can get for less than a quarter at most grocery stores, only so much better and not such "cheap" quality...(a lot less sodium too!).

New Android means new (and better) camera

Asian-Style Noodle Soup
(serves 4-6)

Ingredients:

1 8 or 10 oz. package ramen noodles
6 bunches baby bok choy
4 cups vegetable broth or 2 vegetable bouillon cubes
2 cups water 
2 cloves garlic, minced
1 tbsp soy sauce
1 tbsp hoisin sauce
1 tbsp sesame oil
1 tsp ginger powder or 1/2 tsp diced ginger
1/2 tsp chili paste
Diced scallions and cilantro for garnish

Bring water and broth to a boil. If using the 2 bouillon cubes, add to boiling 6 cups of water. Add bok choy and noodles and boil for 5 minutes more. Bring soup down to a simmer and add soy sauce, hoisin sauce, sesame oil, ginger, garlic and chili paste, if using. The chili paste is very spicy, so if you and your family are sensitive to fiery flavors, omit chili paste. If some people like spicy and some don't, you can always just add to soup after it's ready. 

Some of the brands I used


Ramen

Cooking the bok

Add more seasonings to taste if desired, then serve into bowls when ready. Top each bowl with a little scallion and/or cilantro, plus chili paste if using. I like to add extra, but like I said before, it's very spicy hot so only add a little at a time if you're not familiar with using it. Kids should enjoy the long, curly noodles in this soup. Adding extra veggies will make it even healthier.


This soup can be considered a basic base for a heartier soup filled with vegetables such as these:
  • carrots
  • snow peas
  • bamboo shoots
  • tofu
  • peppers
  • onion
You can also add meat to it, but since it's Meatless Monday I didn't include any in the list of add-ins.

Bok choy is not a vegetable I use often, but after visiting the Hong Kong Supermarket in my area recently, I picked some up (mainly so I could try this other awesome vegetarian recipe that should be the star of next week's MM post!) and then got a craving for this soup. I make it quite often when I need a Chinese-food-and-soup fix. It's just so easy to make and very satisfying.

Anyway, back to the bok. Most Americans don't use bok choy in their average meal plan, but you can find it in most Asian food markets. I highly recommend using organic if you can find it, otherwise be sure to rinse it very well and chop off the hard stem ends like in the picture below.


Bok choy is also very good for you. Like other cruciferous vegetables, bok choy can help to prevent cancer. It also contains many vitamins and nutrients, like vitamins A, C, K and folate. Yet another benefit of bok choy is its blood pressure-regulating properties due to its low sodium content.


Try it in your next stir-fry or eat it raw in a salad. Honestly, I'm not fond of it raw due to it being very bitter-tasting, but many people do like it that way; it's also supposed to be the best way to eat it, health-wise.

Now it's your turn to share your Meatless Monday recipe! Please link up any meat-free dish you'd like below. Link as many as you want! Grab a button and spread the word! Thanks for stopping by :)


Photobucket

<a href="http://jessica-healthymommyhealthybaby.blogspot.com/search/label/meatless%20mondays" target="_blank"><img src="<Photobucket" target="_blank">Photobucket />" alt="Healthy Mommy Healthy Baby" width="125" height="125" /></a>

Friday, June 8, 2012

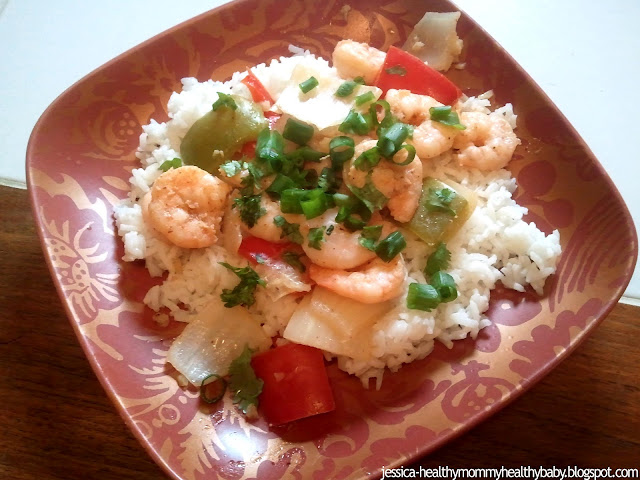
Sweet Saturday #8: Sweet Shrimp Stir-Fry with Rice

Let me tell you. It has been a long week. I almost didn't post today, but then figured I really want to get consistent again with my little blog here, at least for as long as I can, so I shook my lazies out and got back on the iMac...

Today's post is sweet in a surprising way. Remember those shrimp kabobs I made for Memorial Day weekend? Well, I marinated a lot of those shrimp, and cut up more than enough peppers and onions (all the pineapple got used though), so I had a bunch of it sitting in my fridge days after the BBQ. I had to use those shrimp before they went bad, so I came up with a stir-fry version of those kabobs, sans-skewers. They came out extra sweet because the shrimp had been sitting in lime juice and Corona for about 5 days, to the point where they almost didn't even taste like shrimp anymore! I was mostly impressed that they hadn't gone bad by then! I hope you like this version too :)


Sweet Shrimp Stir-Fry with Rice
(serves 4-6)

Ingredients:

1/2 lb cleaned and de-veined large shrimp
1 cup chopped onion
1 cup chopped red and green bell pepper
1 cup chopped pineapple (optional)
3 cloves garlic, minced
1 chive, diced
1-2 tbsp chopped cilantro
2 cups rice, white or brown
1 tsp garlic powder
1 tbsp olive oil
1/2 tsp salt
1/2 tsp pepper
1 tbsp coconut oil

Marinade:

1/2 bottle of pale lager (I used Corona)
Juice of 1-2 limes
1 tsp chili powder
1 tsp sea slat, course but small


Place the shrimp in large Ziploc bag or lidded container and shake up with the marinade mix. Allow to marinade over night or longer (I went for 5 days!). When they're ready, take out of the fridge and heat the olive oil in a large pot for about 1 minute, then add the rice. Saute stirring constantly for about another minute, then add 3 1/2 cups of water and the garlic powder, salt and pepper. Bring to a boil and cook over low heat for about 11 minute or until done.

Meanwhile, it's time to stir-fry. Add the coconut oil to a frying pan and heat over medium-low heat until melted. Add the garlic, onion, peppers and pineapple if using, and cook stirring for about 2 minutes. Then add the shrimp and cook over medium heat stirring occasionally until the shrimp is cooked and no longer translucent. Add extra lime if desired.

Serve the shrimp and vegetables over the rice topped with the chive and cilantro. 


This dish did not go over well with Lily, I must admit, but Paul and I enjoyed it. You can serve this to older kids who like shrimp (3 and up is safe) or add some chicken or tofu if that is more appealing to them. Lily had the rice and veggies with chicken fingers the night we had this :)

P.S. The kabob version is featured on Simple Living today! Whoo-hoo!

BWS tips button


This dish is filled with vitamin-loaded bell peppers, nutrient-rich shrimp, heart-healthy garlic, and lots of fiber if you use brown rice. This dish is tasty and healthy and I think you will really like it!

Now it’s your turn to share! Follow me if you aren't already, then link-up something sweet to share- a blog, an Etsy store, an FB page, Twitter page, Pinterest, whatever! Hop around and say hi. Grab a button to spread the word! Have a great weekend!


Photobucket
<a href="http://jessica-healthymommyhealthybaby.blogspot.com/" target="_blank"><img src="<Photobucket" target="_blank">Photobucket />" alt="Healthy Mommy Healthy Baby" width="125" height="125" /></a>
Related Posts Plugin for WordPress, Blogger...