Showing posts with label anti-cancerous. Show all posts

Sunday, October 7, 2012

Meatless Monday: Pan-seared Asparagus

Today I'm keeping it simple with this easy, yet dinner crowd-pleasing, side dish. Sometimes you just want something that tastes gourmet, even though it only took you a few minutes to prepare it. Search no further- this is it, and it can be done with other vegetables too.


Pan-seared Asparagus
(serves 6-8)

1 lb asparagus, trimmed and rinsed
1 tsp coarse salt
1 tsp coarse black pepper
1 tsp thyme
1 tbsp lemon juice
2 tbsp olive oil

Heat the olive oil in a large skillet over medium-low heat. Once heated sprinkle some of the salt and pepper over the oil, then place the asparagus spears on top. Sprinkle with the rest of the salt and pepper and thyme, then cover, cooking for about 5 minutes. Uncover and stir the spears around, allowing to cook on each side for a period of time until slightly blackened. During the last minute of cooking, toss the lemon juice in and stir the spears around once more. The object is to cook them well enough so that they are crisp, yet soft in the middle. Serve hot with extra seasoning if desired, with some rice and eggplant or other main course. Although this is Meatless Monday, I must add that this side dish goes excellent alongside steak.


Thyme is quite lovely with asparagus, and even better with the added lemon juice. It really brings out its flavor while subduing some of its sharpness. Thyme is full of vitamin K, antioxidants, and iron, as well as antimicrobials that have been used for years to help preserve foods. Fir this dish, you can use it fresh or dried, it will taste good either way. Although, its beneficial properties will be more preserved if used fresh.

Over the weekend we attended a young relative's birthday party, and I was pleased to see Lily pass over her pizza for raw veggies and ranch dip. This was especially good for her since- as you may have read in a previous post -she's been fighting a nasty cold for the past nearly week and a half. We even considered not taking her to the party, but she was having fun with the rest of the group bouncing around at Bounce U! All that's left of the cold now is a cough.

Choosing veggies over pizza

Affirming the values of healthy eating habits for children is a lesson that can last far into adulthood. It is so important for kids to eat healthy and balanced, and including fresh fruits and vegetables in the daily diet is a must. Variety is best, but sometimes there will be types of veggies that they just don't like, or won't even try, such as brussel sprouts. I believe it's important to never give up, and just keep trying new ways to serve it, and even when that doesn't seem to be working, give it a break then try again some other time. Taste buds grow and develop along with your child, and one day they may hate broccoli, then the next thing you know they're asking for seconds!

Now it's your turn to share your Meatless Monday dish below! No rules, other than please only link-up meat-free recipes. No other un-related links or I will remove them. Sorry to sound so harsh, but let's keep it true to what it is, ok? Link up as much as you want, and feel free to spread the word with the button below. Thanks, and have a great week! 

Photobucket

Friday, September 21, 2012

Sweet Saturday #20: Raw Chocolate Banana Tart

For today's post, I'm sharing a really yummy recipe adapted from Good Girl Gone Green's blog. She always has such delicious recipes made with mostly (if not all) raw ingredients. You should definitely go check her out!

Anyway, when she linked this recipe up to Sweet Saturday last weekend, I just had to try it. I had most of the ingredients already, and what I didn't have, I improvised. I also had 2 ripe bananas needing to be used, so I tossed those in too. It came out phenomenal! The only thing I would do in the future is add some honey into the crust because I found it a little bland, but that's just me :) Other friends who tried it said they liked it just the way it was (yes, was, because this baby is gone!).


Raw Chocolate Banana Tart
(serves 8-12)

For crust:
1 cup nuts of your choice, such as almonds or pecans (I used a combination of almonds and cashews)
2 tbsp shelled hemp seeds
2 tbsp flax seed (I used some that were already ground)
1/2 cup coconut oil
1/3 cup shredded unsweetened coconut

For filling:
2 ripe bananas 
1/2 cup raw cacao or cocoa powder (I used cocoa)
1/4 cup honey, agave, or maple syrup 
1/4 cup coconut butter or oil (I used oil)

Note: If possible, soak nuts for up to 4 hours before using. I only soaked them for about half an hour, and everything turned out fine.  

Place nuts, coconut oil, and shredded coconut into food processor and blend until it is a fine crumble. Pour crumbs into a 8' or 10' pie pan and press into the bottom of the pan to form a layer, then place into freezer to set.


Looks like a beach...

Next, melt the coconut butter or oil if it is not melted already. You can keep things raw by melting it in a food dehydrator if you have one, or placing it in a small bowl in a larger bowl of warm water. Once melted, mix the ingredients for the filling together in the food processor, except for one of the bananas, until smooth.


Take the nutty crust out of the freezer, and spoon or pour chocolate banana mixture onto it, spreading it so that about an inch of the crust is still visible. Slice the reserved banana up and place slices on top of tart. Place in freezer until it sets, for about 1 hour (could very well take less, but an hour is for sure). Allow to defrost a bit before serving.


The one thing with placing the sliced banana on top is you have to keep the tart in the freezer once it's done, as to prevent them from getting all brown and gooey. If you'd rather keep it in the fridge so it doesn't take long to defrost (and easier to slice right away!), just don't put banana on top. It will still be beautiful and delicious!

Some other things you could use as toppings are:
  • sliced strawberries
  • blueberries
  • raspberries
  • sliced or crumbled nuts
  • shredded coconut
Just to name a few!

Eating raw helps to contain all natural enzymes present in food, which would be decreased or destroyed from cooking. These enzymes help our bodies to absorb the nutrients found in foods. Cooking food can also cause harmful compounds to form- especially if you burn or overcook something -that can be cancerous.  

In this day and age, it's difficult to go completely raw, but it's good to eat as much raw foods as possible, especially fruits, vegetables, and legumes. This tart will enable you to eat healthy and raw without having to lose the enjoyment of eating! Good Girl Gone Green has TONS of fantastic raw food recipes on her blog, as well as information about choosing a healthier raw lifestyle, so do take a look if you are curious about eating raw! 


OK- now it's time for the hop! Our guest-hostess today is April from April's Country Life Blog. She has the most adorable tea party treat recipes and other fun country-style tidbits. Please follow her and show her some love! 

I especially liked this fabulous cake she made for her daughter's birthday !

Just follow these simple rules:

1. Link up something sweet to really WOW us all- your blog, Etsy store, Pinterest, Facebook, whatever you want! 
2. Link-up as much as you want and please follow April's Country Life Blog and me if you are not already. Leave me a comment if you are a new follower so I can follow you back!
3. Hop around and say hi. 
4. Share my button to get more people to join us (not required, but it would be nice!)

 
Photobucket
<a href="http://jessica-healthymommyhealthybaby.blogspot.com/" target="_blank"><img src="<


Photobucket" target="_blank">Photobucket

Monday, July 30, 2012

Meatless Monday: Frozen Tahini-Banana Bites

Every so often I stumble across a recipe that gets me really excited. The requirements for such excitement usually are:
  • unusual prepartation or ingredients
  • uses ingredients in a way I never thought of
  • is not only delicious, but also healthy!  

And I get especially excited when it's an easy-to-make dessert that is sugar-free and I just so happen to have all the ingredients readily available! 

I came across the recipe for Frozen Yogurt Tahini Banana Cups (what a mouthful!) via Simple Living with Diane Balch (currently my favorite food blog, I might add!) when Fox in the Kitchen linked it up onto the Foodie Friday blog hop. Fox in the Kitchen has a wealth of awesome recipes on her blog, so do check her out, and she based the recipe off of the vegan version from The Veggie Nook (lots of good stuff there, too!). And she got the recipe from Sketch-Free Eating, a blog that has many amazing raw-based recipes, and they got it from...somewhere. I couldn't find the original recipe on their blog, they have way too much amazingness on there that easily distracts me...

SO, with all that being said, you know this recipe has to be awesome if so many people felt the need to keep passing it on! I made a batch for a Sunday afternoon gathering, and I'm sorry to say they did not go over as well as I'd hoped, although I found them to be so yummy and delicious that I ate half the batch myself. They are lightly sweetened and just melt in your mouth! Not everyone is as enthusiatic about healthy-eating as I am. That's why I am so grateful for my blogging community that can appreciate recipes like these, at least I hope so...

I had the cute Disney cupcake liners left over from Lily's 2nd birthday party :)

Frozen Tahini-Banana Bites
(this is the exact recipe from Fox in the Kitchen, but I just think that title is less of a mouthful!)

Ingredients:

1/2 cup of cold-pressed coconut oil
1/2 cup tahini
1-2 ripe banana
1/2 cup plain regular or Greek yogurt 
4 tbsp honey or agave (you can use less, but I thought this was the perfect amount)
1 tbsp raw sesame seeds
Pinch of sea salt
24 blueberries+ for topping (optional)
24 cupcake liners 

Note: the recipe from Fox in the Kitchen says this makes 2 dozen, but I was only able to make half of that with this amount. Perhaps I used too much batter per cupcake cup, or perhaps I just used larger-sized cupcake cups than she did, but if you want to make the full 24, I suggest not to be too generous with filling each cup with the mix.

What I used

Combine the coconut oil, salt, honey or agave, and tahini in a small bowl; it will work better if the tahini and coconut oil are softened or melted. Next, add the yogurt until well-combined. Slice the banana(s) into 24 slices. Spoon some of the mixture into each cupcake liner, then place a piece of sliced banana on top, sprinkled with some of the sesame seeds. Place cupcake cups on tray in freezer and freeze until batter is set, for about 5 or so minutes.

The batter
After first freezing phase

Take the tray out of the freezer then spoon the rest of the batter on top. Sprinkle with sesame seeds and then place tray back into freezer. Allow treats to freeze for at least one hour before serving.

Now, to "add a little something", I placed a single, fat blueberry on top of each treat to make it look a little more appealing. I think they came out cuter-looking that way, and you can of course get even more creative with whatever you choose.  


Another thing I did to make things more fun was to put blueberries in the middle of one of the treats for one of the kids to find. Whoever got the treat with the blueberries in the middle won a prize! (In this case, my friend's daughter found them and she won a word card game. She was very pleased with this:). 

After taking my first bite, I thought of so many other creative ways you can mix this recipe up. Here are some suggestions:
  • use peanut or almond butter in place of tahini
  • add raw carob or chocolate shavings as topping
  • add extra fruit to the middle or top
  • mix chocolate, vanilla, almond, etc. flavoring into batter
  • put jelly in the middle

I am going to try and make them with peanut butter and chocolate next time! They may go over better with the pickier eaters in my life that way. Plus, how can such a flavor combination go wrong?

The general consensus of this recipe among my family and guests was:

Friend 1: "Good, but weird."
Friend 2: "Tastes like halvah; could use more banana."
Daughter of friend 1: "No thanks." (she's vegan)
Daughter of friend 2: "Yum." (she found the blueberries)
Lily: peeled off the banana and left the rest
Paul: "Yuck!"
Me: "Yum, yum, yum, I'll eat the rest!"

I hope the mixed response does not deter you from trying this if you're curious and especially if you're passionate about raw food and healthy eating. This is super-easy and cheap to make and definitely a much better alternative to store-brought popsicles and ice cream. 

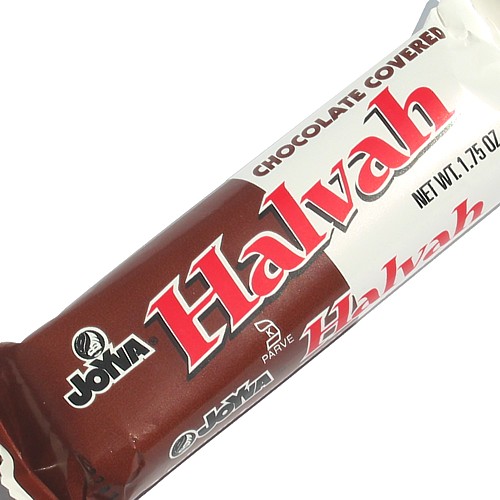
Tahini is an incredibly tasty and versatile ingredient that I don't think is used much at all in the western world. It is a very popular condiment and ingredient in parts of Africa and the Middle East, used as a sauce in many yummy dishes. Tahini is essentially sesame paste; when mixed with water and a little salt, if makes a salty, nutty sauce that can be used as a topping on things like tofu, chicken and vegetables, or as a great salad dressing. This is the first time I've seen it used in a dessert other than Halvah. If you don't know what Halvah is, it is like a Turkish candy bar (pictured below). 

Halvah can also refer to any sweet, dense sesame seed treat, but this is the most recognized and commercial version in the West

Sesame seeds contain an abundance of vitamins and minerals such as copper, manganese, calcium, iron and vitamin B1, plus much more! That's a lot for such a small seed. These nutrients can help heal and prevent ailments such as arthritis, colon cancer, and osteoperosis. They also help to lower cholesterol and support bone health.

Have a happy Meatless Monday and do let me know if you try this unique recipe, and also if you decide to pass it on as well :)


Friday, July 13, 2012

Sweet Saturday #13: Strawberry-Kiwi Lemonade!

Once again, we had a great turn out last Sweet Saturday. Yay! Thanks to everyone who linked up! Let's make it BIGGER this time, ok? I'm officially addicted to having a large turn-out at my link parties now :) ...


Today's recipe was inspired by this tasty-looking treat I came across last week that I just had to try: Strawberry Lemonade from Addicted to Recipes. Mine is a little different because I used less sweetener and added kiwi since I had 2 that were a bit overripe and needing to be eaten. The result came out REALLY GOOD, so I hope you like it enough to try it. Let me know if you do!

What a pretty color, right?
Strawberry-Kiwi Lemonade
(makes 1 pitcher full)

Ingredients:

3-4 lemons
1 cup strawberries
2 kiwis
1/2 cup sugar or 1/3 cup stevia
1 1/2 cup water
1 small aloe leaf
4 cups water

Heat the sugar or stevia with the 1/2 cup of water over medium heat until dissolved, stirring occasionally. Remove from heat once sugar or stevia is completely dissolved and allow to cool. Meanwhile, juice the lemons and set aside. Hull and halve then quarter the strawberries then put into blender with 1 cup if water. 

Strawberries in water
Slice the aloe leaf lengthwise so one side of the leaf exposes the gel. Scoop the gel out and add it to the strawberries and water. Next, add the sugar syrup and hit puree. Lastly, add the lemon juice and water. You can just mix them together with the strawberry concoction if your blender has a "Mix" or "Stir" setting, or just pour everything into a pitcher and stir it up that way.


It will look like this once you blend it all up

And you may have a mess to clean up that looks something like this

You can serve this sweet and refreshing drink with fresh fruit or mint as garnish. Additionally, you could also add some ginger and/or cucumber to the mix, similar to the last lemonade recipe I posted. I recommend allowing to sit your fridge overnight, or at least for a few hours, before serving, to allow the flavors to blend properly. I know my first sip was almost too sour-tasting, but the next morning when I had a glass it was perfect!


This lemonade is particularly healthy and detoxifying with the added benefit of aloe. Aloe is already largely well known for it's cleansing benefits, as well as its soothing benefits when used topically on burns. But, did you know aloe also helps to halt tumor growth, lower blood sugar and cholesterol, prevent kidney stones, and boost cardiovascular performance, among many other things? Read this link to learn more!

This is terrific punch to serve to your family, friends, or at a party. It will be a hit with everyone, especially the kids. Adding the kiwi to this makes me reminisce about the Strawberry-Kiwi flavor Snapple used to make, but this is so much better! Better tasting and better for you ;)

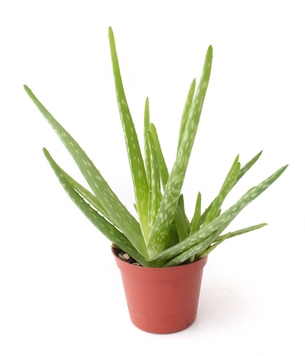
Notice I added aloe gel to this; I use aloe all the time. It's the best burn treatment and can easily be added to any fresh juice of smoothy. But, alone it tastes rather bitter. You can even use it as a moisturizer and to speed up the healing process on cuts and scrapes by apply a little bit right onto the wound. Aloe truly is a wonder plant!

This is how one of my plants looks when the leaves aren't all chopped off. This image is courtesy guide-to-houseplants.com

I will warn you of one thing when consuming aloe, though: it's diuretic, so don't give too much to little ones unless you want them to poop a lot! Just a tip ;)


OK, now it's your turn! Follow these simple rules:

1. Link up something sweet to really WOW us all- your blog, Etsy store, Pinterest, Facebook, whatever you want! 
2. Link-up as much as you want and please follow me if you aren't already, and our guest-hostess, Mary, at A Day in the Life. Leave us a comment if you are a new follower so we can follow you back!
3. Hop around and say hi. 
4. Share my button to get more people to join us (not required, but it would be nice!)


Please show Mary and her lovely blog lots of love, she's new to the blogging scene- plus she has really cute twins for you to ogle!

Thanks so much for linking up, I really do love the weekend even more because of this :)


Photobucket
<a href="http://jessica-healthymommyhealthybaby.blogspot.com/" target="_blank"><img src="<Photobucket" target="_blank">PhotobucketPhotobucket />" alt="Healthy Mommy Healthy Baby" width="125" height="125" /></a>

Sunday, June 17, 2012

Meatless Monday: Asian-Style Noodle Soup

I hope everyone had a nice Father's Day with their dad, husband, grandfather, brother, friend, whoever this weekend. Poor Paul has a toothache, so his wasn't as grand as it could've been. We did go to a local fair and had some fun there, so I'm glad we at least did that.

Yesterday I had a craving for this simple noodle soup and decided to have it for dinner last night. It's perfect for Meatless Monday too, and you can make it in about 30 minutes! It's similar to those packages of instant ramen noodles you can get for less than a quarter at most grocery stores, only so much better and not such "cheap" quality...(a lot less sodium too!).

New Android means new (and better) camera

Asian-Style Noodle Soup
(serves 4-6)

Ingredients:

1 8 or 10 oz. package ramen noodles
6 bunches baby bok choy
4 cups vegetable broth or 2 vegetable bouillon cubes
2 cups water 
2 cloves garlic, minced
1 tbsp soy sauce
1 tbsp hoisin sauce
1 tbsp sesame oil
1 tsp ginger powder or 1/2 tsp diced ginger
1/2 tsp chili paste
Diced scallions and cilantro for garnish

Bring water and broth to a boil. If using the 2 bouillon cubes, add to boiling 6 cups of water. Add bok choy and noodles and boil for 5 minutes more. Bring soup down to a simmer and add soy sauce, hoisin sauce, sesame oil, ginger, garlic and chili paste, if using. The chili paste is very spicy, so if you and your family are sensitive to fiery flavors, omit chili paste. If some people like spicy and some don't, you can always just add to soup after it's ready. 

Some of the brands I used


Ramen

Cooking the bok

Add more seasonings to taste if desired, then serve into bowls when ready. Top each bowl with a little scallion and/or cilantro, plus chili paste if using. I like to add extra, but like I said before, it's very spicy hot so only add a little at a time if you're not familiar with using it. Kids should enjoy the long, curly noodles in this soup. Adding extra veggies will make it even healthier.


This soup can be considered a basic base for a heartier soup filled with vegetables such as these:
  • carrots
  • snow peas
  • bamboo shoots
  • tofu
  • peppers
  • onion
You can also add meat to it, but since it's Meatless Monday I didn't include any in the list of add-ins.

Bok choy is not a vegetable I use often, but after visiting the Hong Kong Supermarket in my area recently, I picked some up (mainly so I could try this other awesome vegetarian recipe that should be the star of next week's MM post!) and then got a craving for this soup. I make it quite often when I need a Chinese-food-and-soup fix. It's just so easy to make and very satisfying.

Anyway, back to the bok. Most Americans don't use bok choy in their average meal plan, but you can find it in most Asian food markets. I highly recommend using organic if you can find it, otherwise be sure to rinse it very well and chop off the hard stem ends like in the picture below.


Bok choy is also very good for you. Like other cruciferous vegetables, bok choy can help to prevent cancer. It also contains many vitamins and nutrients, like vitamins A, C, K and folate. Yet another benefit of bok choy is its blood pressure-regulating properties due to its low sodium content.


Try it in your next stir-fry or eat it raw in a salad. Honestly, I'm not fond of it raw due to it being very bitter-tasting, but many people do like it that way; it's also supposed to be the best way to eat it, health-wise.

Now it's your turn to share your Meatless Monday recipe! Please link up any meat-free dish you'd like below. Link as many as you want! Grab a button and spread the word! Thanks for stopping by :)


Photobucket

<a href="http://jessica-healthymommyhealthybaby.blogspot.com/search/label/meatless%20mondays" target="_blank"><img src="<Photobucket" target="_blank">Photobucket />" alt="Healthy Mommy Healthy Baby" width="125" height="125" /></a>

Friday, May 4, 2012

Family Favorite Friday: Creamy Cauliflower and Carrot Curry Soup

With the ever-fluctuating cold/warm weather we've been having lately, a sudden cold spell put me in the mood for a cozy soup...and then it put me in the mood for curry. I looked in my fridge and saw that I had a head of cauliflower that needed to be used and a few carrots. I had those, and all the required ingredients for making a curry soup. Huzzah!


Creamy Cauliflower and Carrot Curry Soup
(serves 8+)


Ingredients:


1 head of cauliflower, chopped
4 carrots, peeled and diced
1 medium onion, diced
4 cloves garlic, minced
3 cups chicken or vegetable broth
3 cups water
2 cups cream (light or heavy)
4 tbsp flour
4 tbsp butter
2 tbsp olive, coconut or canola oil (all taste great!)
2 tbsp curry powder
Salt and pepper to taste
Hot sauce to taste (optional)


Saute the onion and garlic in a large pot with the oil for about 5 minutes or until fragrant. Mix in the curry powder until onions and garlic are well-coated, cook for another minute, then add the cauliflower and carrot. Cook over medium-low heat, stirring continuously for another minute, then add the water and broth. Bring to a boil, adding the salt and pepper to taste and more curry if desired as it cooks. Cook for 15 minutes, or until vegetables are tender.


Once, ready, remove from heat and blend with an immersion blender. If you're like me and do not have one of those nifty things, then pour into blender in batches. Be careful not to fill to the top of the blender to avoid over-flowing, and be careful not to burn yourself! Set blended soup mixture aside in separate bowl. 


In the same pot you cooked the vegetables in, melt butter over low heat. Mix in the flour with a beater until smooth, then add the cream. Cook over medium-low heat until smooth and bubbly, whisking as it cooks. Slowly stir in the vegetable soup mix until well-blended with the cream mix. Add in hot sauce if you want it hotter, otherwise serve as is with some toasted bread (I recommend sourdough, naan or rye). 


I decided to add a little extra curry after soup and cream were combined
garnished with a few drops of hot sauce and some parsley


I made this soup for Meatless Monday this week and it has been the best leftovers. I just couldn't wait until Meatless Monday next week to post about it! Paul loved it, I loved it, and even Lily loved it. This is how she had it- as a sauce over steamed cauliflower and carrots:


with a happy blue unicorn!


This is such a yummy soup for a cozy, rainy day that anyone will enjoy. If you don't add the hot sauce, it is quite mild in spiciness so picky eaters should love it too. The carrots give it a nice sweetness, while the cauliflower blends perfectly with the cream. This soup is also a powerhouse of nutrients and health aides, containing vitamins C and K from the cauliflower, vitamin A from the carrots, the cleansing power of turmeric from the curry, and the anti-cancerous and blood pressure-lowering benefits from the garlic. 


Baby can enjoy some of the carrots and cauliflower steamed until very soft, pureed and mixed with breast milk or formula. Add a little whole grain cereal for extra "umph." Carrots and cauliflower are safe for infants over 3 months to eat (depending on what your pediatrician recommends, always check with them first!).


Have a great weekend!


Related Posts Plugin for WordPress, Blogger...